Pages

Showing posts with label cake. Show all posts

Monday, February 6, 2012

Woodland Baby Shower

Awesome chalkboard from the craft store.
In case you didn't know, my sister is having a baby. It's kind of a big deal. Things will change. Priorities will shift. Attention will be diverted. And I will get a new nephew!
A little bit of love.
I already have two very adorable nephews whom I love very, very much. As in, so much that I never knew was possible. Sometimes its so much that I want to eat their cute little chubby cheeks, but I have pretty good self-control. Instead I just cover their squishy cheeks with kisses. And I can't wait to do that with my sister's baby when he arrives.
Sign made with wood blocks and scrapbooking paper.
Said baby will be named Fox (as in Fox Mulder), so naturally, my sister wishes to decorate the nursery in a woodland theme. And thus, I threw my sister a woodland-themed baby shower. I wanted to use decorations that my sister could then use in the nursery. I like things that are multi-purpose.

The famous stump cake!

I knew right away that I would make some kind of log cake, and ended up going with this fabulous stump cake and decorated it with meringue mushrooms. As for the rest of the food, since it was a mid-afternoon affair, I went with snackables like fruit salad, veggies with dip, and assorted nuts. And punch! What is a party without punch, after all?


Lime-grapefruit punch.
It's a mushroom! It's meringue!
It's a shy little mushroom.
Mason jar, moss ribbon, string, dirt, and a votive candle.
Aw, nuts!

Note: I did not take any of these photographs. A very good friend of mine was kind enough to come take some pictures for me.

Sunday, January 29, 2012

Chocolate Cake with Chocolate Frosting (because they don't make band-aids for your heart)

Mmm...nice and round...
Happy New Year! A little late, I know, but I've been busy. Actually, I was sick there for awhile. First it was shingles, which kept me away from my nephews. Sadly, my newest nephew decided to arrive right when I was at my most contagious, so I had to wait a week to meet him. But meet him I did, and he's as sweet as can be.

Normally I start out every new year with some grand resolution, something to bring about fantastic change in my life. Given that last year's aspirations failed miserably, this year I decided to go a little more low-key. My only resolutions this year are to just stay true to myself, and live a story worth telling. It turns out that living a story like that means ignoring what other people say is the right or acceptable way to do things. So I'm going to do things my way, and if I offend anyone in the process, then they don't belong in my story.

This year, I am going to throw everything I have into the universe. I'm interested to see what I get in return. On that note, I offer the universe this chocolate cake. It doesn't necessarily mend a broken heart, but it does soothe it a little. It's a simple and easy to make chocolate cake. Light, fluffy, and moist, with a sweet, chocolatey frosting. The kind of cake you can eat a large slice of without feeling terribly guilty afterward.

Slice of awesome.
Chocolate Cake
from the back of the Hershey's Cocoa can

2 cups sugar
1 3/4 cup all-purpose flour
3/4 cup natural cocoa powder
1 1/2 tsp baking powder
1 1/2 tsp baking soda
1 tsp salt
2 eggs
1 cup milk
1/2 cup vegetable oil
2 tsp vanilla extract
1 cup boiling water

Preheat the oven to 350 degrees F. Grease and flour two 9-inch round baking pans.

Combine the dry ingredients in the bowl of a stand mixer and mix until blended. Add the eggs, milk, oil, and vanilla (which I forgot...) and beat on medium speed for 2 minutes. Stir in the boiling water and pour into the prepared pans.

Bake for 30-35 minutes, until the cake springs back when lightly touched and a toothpick inserted in the center comes out clean. Cool for 10 minutes, then turn onto wire racks to cool completely.

Chocolate Frosting
from the back of the Hershey's Cocoa can

1 stick unsalted butter, softened
2/3 cup natural cocoa powder
3 cups powdered sugar
1/3 cup milk
1 tsp vanilla extract

Melt the butter in a small saucepan over low heat. Pour the butter into the bowl of a stand mixer and beat in the cocoa. Alternately add the powdered sugar and milk until smooth and fluffy, with the mixer on medium speed. Stir in the vanilla. Frost and serve.

Enjoy!

Don't you want me, baby?

Saturday, December 31, 2011

Racines Cake for Christmas Eve

Mmmm...chocolate...
Welcome to my last post of 2011, a year that shall go down in (my) history as one of my least favorites. It was filled with anxiety, depression, heartache, disappointment, loneliness, and frustration. True, there were a few upsides (trip to Paris, anyone?), but in all, it was a year I wouldn't mind forgetting.

So instead of reflecting on the year that was, I would like to look forward to the year that will be. Granted, I started of 2011 with a great deal of optimism for what was sure to be a great year to come, but I am certain that 2012 has better things in store for me than 2011. I am hoping that my falling apart in 2011 only created an opportunity for me to put myself back together in a more fabulous shape in 2012.

So, in parting with 2011, I leave you with a recipe for a most delicious and simple chocolate cake. I wish I had thought to pair it with a peppermint whipped cream, since I served it on Christmas Eve, but it was just as delicious with the orange flower-scented whipped cream that I made. For me, this cake was simply perfect: light, chocolatey, and decadent. Fancy enough for a celebration, but simple enough to pull together in a pinch.

So fancy!
Racines Cake
from Ready for Dessert

10 oz bittersweet chocolate (I used 70%), chopped
1 stick unsalted butter, cut into pieces
1 tbsp freshly brewed espresso
1/2 tsp vanilla extract
6 lrg eggs, at room temp
1/4 cup plus 2 tbsp granulated sugar
2 tbsp cocoa nibs

Preheat the oven to 350 degrees F. Prepare a 9-inch springform pan by buttering it and dusting it with cocoa powder.

In a large heatproof bowl, combine the chocolate, butter, and espresso and melt over a pan of simmering water. Stir until smooth, then remove from the heat and add the vanilla.

In a smaller bowl, combine the egg yolks and 1/4 cup sugar and beat on medium-high speed with a hand mixer until the mixture is light and creamy, about 1 minute.

In a clean, dry medium-sized bowl, beat the egg whites on low speed until they begin to hold shape. Add the 2 tbsp sugar and beat on high speed until the whites hold soft peaks.

Fold the egg yolks into the chocolate mixture, then fold in half of the egg whites. Carefully fold in the remaining whites until there are no streaks of white- don't overfold!

Scrape the batter into the prepared pan, then sprinkle the cocoa nibs evenly over the top. Bake until the cake is barely set in the center, abut 25 minutes. Let cool completely.

Enjoy!

Monday, September 5, 2011

Piña Colada Cake and the Big Screw-Up

Come with me and escape!
Do you like piña coladas? Well, I do. I don't think you can go wrong with the combination of pineapple and coconut, especially when we're talking about cake.

My family decided to celebrate Labor Day this year on Sunday so that everyone would have Monday to recover. What exactly we were supposed to be recovering from, I am not sure, so I figured I'd booze up our little shindig to give everyone something to recover from. To that end, I made this piña colada cake (which has rum in it), and a white sangria. My dad made a red sangria, so for those of us who were imbibing, there was plenty of alcohol. Not that we're lushes or anything. We were simply enjoying the last hurrah of Summer that is Labor Day weekend.

Sunken middle :(
The party was one of my family's less eventful affairs. For me, the highlights were renaming my sister Frakah Khan (and then my nephew deciding my sister should name her baby Frakah Khan), and having a little dance party with my sister and my nephew. I taught my nephew how to do the sprinkler, the blender, the bump, and the dip. He really took a liking to the blender, and he had me dip him over and over again until I thought my arm would fall off. I tried teaching the kid how to do the running man, but he took one look at that move and said, "no, me can't do that." Ah well, one day...

Holey piña colada cake, Batman!
I suppose there was one minor event during the preparation of my family's get-together: I screwed up the cake. I prepared it perfectly, but it turned out that I did not bake it long enough. Yeah, I undercooked the cake. I was very upset about this because I was really looking forward to enjoying the cake. Luckily, it was only the top part of the center of the cake that was not cooked all the way, so I simply cut a hole into the cake, glazed the cake, and filled the hole with pineapple. Problem solved! In the end, despite my little mistake, the cake was still delicious, moist, and tropical. Perfect for an end of Summer treat.

Piña Colada Cake
from here

2 cups all-purpose flour
1 tsp baking powder
3/4 tsp baking soda
1/2 tsp salt
1 stick unsalted butter, softened
1/4 cup light brown sugar
1 tbsp dark rum
2 lrg eggs, at room temp
1 cup cream of coconut
1/2 cup finely chopped fresh pineapple
1 tbsp rum, +2 tsp for glaze
2 tbsp pineapple juice, +2 tsp for glaze
1 cup powdered sugar
pinch of salt

Preheat oven to 350 degrees F. Butter and flour a 9-inch cake pan and line the bottom with a circle of parchment paper.

In a medium bowl, whisk together the flour, baking powder, baking soda, and salt. In the bowl of a stand mixer, beat the sugar and butter until light and fluffy, about 2 minutes. Add the eggs one at a time, being sure to scrape down the sides of the bowl. Mix in the rum and cream of coconut until combined. In two additions, mix in the dry ingredients on low speed. Mix until just combined. Fold in the pineapple chunks.

Pour the batter into the prepared cake pan and bake in the center of the oven for 35-40 minutes, until a toothpick inserted in the middle comes out clean (and make sure the cake does not jiggle!). Cool the cake on a wire rack for 10 minutes, then invert onto another wire rack. Poke holes in the cake using a toothpick, then drizzle over the mixture of 1 tbsp rum and 2 tbsp pineapple juice. Allow the cake to cool completely.

To prepare the glaze, whisk together the powdered sugar, pinch of salt, and rum and pineapple juice. Slowly drizzle the glaze over the cake, trying to get it even over the top.

Enjoy!


Friday, September 2, 2011

Peach Champagne Cake and the Case of the Missing Passport

Peachy!
I am fairly certain that I have lost both my mind and my passport. Both seem to have evaporated into thin air. I have searched high and low, looking in the same drawers and boxes four or five times each and nada. Nothing!

It's a little bit funny to me that the one time I plan a transatlantic trip on short notice, I cannot find my passport. What's really funny to me is the fact that I'm doing this trip to kind of recharge myself and do a little soul-searching, and in the meantime, I cannot find the piece of identification necessary to go on said soul-searching journey. I have lost my identity and it is time for a new one!

Okay, okay, none of that has anything to do with this fabulous cake I made for my coworker's birthday. This cake was actually my first commissioned cake (ordered by my boss), so I felt a little bit of pressure to make it special. I decided on peach champagne because it is Summer and I thought nothing says Summer like peaches and champagne. Plus, I've never made a champagne cake before, so this was a good opportunity to give it a try.

The cake was delicious. Moist and light and bubbly. Like champagne! And it was peachy! A nice Summer celebration cake, and very easy to make. In the future, I might use this cake as a jumping point for a kir royale cake, or a champagne chambord cake...

So delicious!
Peach Champagne Cake
adapted from here


2 sticks unsalted butter, at room temp
2 cups sugar
1 tsp vanilla
6 egg whites
3 cups all-purpose flour
3 tsp baking powder
1/2 tsp salt
3/4 cup dry champagne
1/4 cup peach schnapps

Butter and flour 2 9-inch cake pans, and cut out two circles of parchment to put into the bottom of the pans (after buttering, before flouring- makes for a very easy removal). Preheat the oven to 350 degrees F.

Combine flour, baking powder, and salt in a medium bowl. In the large bowl of a stand mixer, beat the butter and sugar until light and fluffy, 3-5 minutes. Add in the vanilla and beat in the eggs whites, one egg white at a time (be sure to scrape down the sides of the bowl often).

Add in one third of the flour mixture at a time, mixing on low just to combine, then alternate by adding in half of the alcohol mixture. Repeat until all ingredients are combined.

Pour the batter into the prepared pans and bake for 30-35 minutes (depending on your oven).

Peaches and Cream Filling


1 peach
1 cup whipping cream
1 tbsp sugar

Peel the peach and dice it into small pieces. In a medium bowl, beat the whipping cream and sugar together on high speed with a hand mixer until stiff peaks form. Gently fold in the peaches.

Peach Champagne Frosting


1 1/2 sticks unsalted butter, at room temp
4 cups powdered sugar
1/4 cup champagne
1 tbsp milk
1 tsp peach schnapps
1 tsp vanilla
1 drop red food coloring

Beat the butter and vanilla together using the whisk attachment in a stand mixer. Add the sugar one cup at a time. Beat in the liquid ingredients.

Mmm, pretty...
To assemble the cake:
Cut the tops off of the cakes to create a level working surface (easier said than done, folks). Place one layer on your serving surface of choice (I had a cardboard cake circle). Spoon out about a cup or so of the peaches and cream filling on top of the cake and smooth it out to within 1 inch of the edge of the cake. Place the second layer of cake on top of the layer of filling, making sure to center it. Start by frosting the top and sides of the cake with a thin layer of frosting (to cover up the crumbs). Now add the rest of the frosting and smooth it out however you like (I like the rustic look, personally). For the top of the cake, I cut 7 thin slices of peach, soaked up the extra juice with a paper towel, brushed them with lemon juice, and fanned them out in a circle on top of the frosting. Voila! A celebration cake!

Wednesday, August 17, 2011

Emergency Chocolate Cake

Sorry, this is the only picture I got; I was a bit excited about eating the cake...
So my blog has been on hiatus for a few weeks, mostly because I did not bake any new recipes. Okay, so that's not entirely true- I did make some muffins, but they weren't good enough to write about. Instead, I made coffee ice cream and my famous chocolate chip cookies because I was in the mood for something familiar.

But I'm back with a recipe for Emergency Chocolate Cake from Cook's Illustrated. I'd been feeling a bit of the summertime blues last week, so I figured an easy chocolate cake was what the doctor ordered. While the cake did not actually fix anything, it got me back in the baking spirit. It was also delicious.

No, what really is really helping me right now is a reminder from one of my best friends. I remember feeling this way when I studied abroad, and I told my friend about it. She reminded me that I got through that time, had the best time of my life after it, and if it were not for that, we would not be such good friends. Sometimes you need a friend who has been there for you before to remind you of just how strong you are. So I'm back. And I want to share a poem that has been playing in my mind today: Invictus.

Emergency Chocolate Cake
adapted from Cook's Illustrated


7.5 oz unbleached all-purpose flour
7 oz sugar
1/2 tsp baking soda
1/4 tsp sea salt
2 oz Dutch-processed cocoa powder
2 oz bittersweet chocolate, chopped fine
1 cup hot coffee
2/3 cup mayonnaise
1 lrg egg
2 tsp vanilla extract

1. Adjust oven rack to middle position, preheat oven to 350 degrees F, and coat an 8x8-inch baking dish with nonstick cooking spray.

2. Whisk the dry ingredients together in a large bowl. In a medium bowl, combine the chocolate and cocoa powder, then pour the hot coffee over it and whisk until smooth; let cool. Whisk in the remaining ingredients. Stir the wet ingredients into the dry ingredients and stir until combined.

3. Pour the batter into the prepared baking dish and bake for about 30 minutes, or until a toothpick inserted in the center of the cake comes out clean.

4. Allow cake to cool on wire rack. The cake can be eaten plain, or served with ice cream.

Sunday, May 22, 2011

50th Post, A New Name, and a Banana Cake with Mocha Frosting

About as fancy as I can make it look.
Things are looking a little different around here, aren't they? I've been thinking about it for awhile, and I finally decided to make some changes. I knew that "Put Some Honey On Your Cornpone" was to be a temporary blog name for me until I found a name that I thought really represented who I am. I found said name a couple months ago (I think it may have come to me in a dream), but I was waiting for the right moment to make the change. What better time for that than the 50th blog post?

I know, I can't believe it either. I actually stuck with this long enough to have a 50th blog post. I've been known to not finish the things I start (I know- I'm one of those people).

So what's with the new name, you might ask? In case you didn't already know, I am not just an amateur baker. I'm an amateur belly dancer as well. I've been dancing for 3 1/2 years and performing for 1 1/2 years. I love it. And I even love dancing while I'm baking. I do a lot of dancing in the kitchen, really. It's hard to resist the urge to shake my hips when good music is playing. So here I am, combining my two loves: baking and belly dancing.

To celebrate, I decided to make a two-layer cake. I've had some ripe bananas sitting in my freezer for ages, so I thought this would be a good time to make David Lebovitz's Banana Cake with Mocha Frosting (from Ready for Dessert). I made a few little changes, mostly in omitting the nuts. There are supposed to be pecans or walnuts in the cake, but anyone who knows me well knows that I am morally opposed to nuts in things that should be soft (cakes, brownies, ice cream, etc.). I think if I had a mafia name, it would be something like Ray-Ray No-Nuts. That probably sounds really wrong.

This cake is a rather tasty cake. It has been a very long time since I've had a banana cake, and this one reminds me how delicious they are. Soft, moist, mildly fruity with a hint of cinnamon. I kind of overcooked it, but you only notice it at the edges of the cake. The frosting is a little too rich for my tastes. I much prefer a sweet, more balanced frosting. This one is like a buttery ganache, which, believe it or not, is not my favorite. This cake would pair well with a nice glass of cold milk.

Banana Cake
Enjoy!
adapted from Ready for Dessert


350g all-purpose flour
1 1/2 tsp ground cinnamon
1 1/2 tsp baking powder
3/4 tsp baking soda
1/2 tsp salt
1 cup unsalted butter, at room temp.
300g sugar
1 tsp vanilla extract
1 tbsp instant espresso powder
2 lrg eggs, at room temp
6 tbsp lowfat sour cream
2 cups banana puree (see note)

Preheat oven to 350 degrees F. Butter 2 9-inch round cake pans and line the bottoms with parchment paper.

In a medium bowl, whisk together the dry ingredients (flour through salt).

In a large bowl, beat together the butter and sugar using a hand mixer on high speed (unless you have a mega-powered hand mixer, which I do not). Beat until light and fluffy, 3 to 5 minutes. Add the vanilla and espresso powder and beat until combined. Add the eggs one at a time, beating after each addition until combined. Mix in half of the flour mixture, and then add the sour cream and banana puree. Stir in the remaining flour mixture, being careful not to overmix.

Divide the batter evenly between the prepared pans and place in the center rack of the oven. Bake for about 40 minutes, or until a toothpick inserted in the center comes out clean. Remove from the oven and let cool.

Note: For the banana puree, to get 2 cups, I used 4 small overripe bananas, 2 medium fresh bananas, and a few spoonfulls of sour cream (since the bananas provide needed liquid).

Mocha Frosting


10 oz semisweet chocolate, coarsely chopped
1/2 cup strong brewed coffee or espresso
10 tbsp unsalted butter, cut into pieces, at room temp

In a double boiler, melt the chopped chocolate with the coffee, stirring continuously. Once melted, remove the bowl from the heat and add the butter, stirring until thoroughly combined. Place the bowl in the fridge and stir occasionally until the frosting reaches a spreadable consistency.

To assemble the cake:
Place the first layer of cake upside-down on a cake platter.
Spread a layer of frosting over top of the cake.
Place the second layer of cake on top of the frosted layer.
Spoon the remainder of the frosting on top of the cake and spread evenly .

Sunday, May 15, 2011

Tres Leches Cake

Way better than strawberry shortcake.
Oof. It's been one of those weeks. Nothing bad happened, in fact good things happened, but that didn't prevent me from feeling a little down. This happens sometimes, a little more often now that I live alone. It mainly happens when I start comparing myself to other people, which is never really a good thing for me to do. I'm just a little different, and I always have been.

Flowers from the market.
So I turn to baking, which is the one area of my life that I am really confident in. I don't often fail in the kitchen, and if that's me bragging, I think I'm allowed that much at this point. It's funny that I feel like it's my sole contribution to society. I remember in third grade making friends by sharing my fruit snacks in class. It was the only way I could get the semi-popular kids to like me. I still try to make friends using my mad skills in the kitchen, but it's a bit trickier than that now.

Strawberries!
This week I decided to get back to my baking roots by baking a cake. Cakes are what got me into baking in the first place. I chose to make a tres leches cake because I love the sweet sogginess of it, and I had never tried making one before. I found a recipe that looked pretty simple and forged ahead with my plan.

Mojito!
But with cake, I needed people to serve it to. I cannot consume an entire cake by myself, though I have been tempted in the past. So I asked my family if we could do a family dinner this weekend, and it didn't take much convincing. We decided to go with the Latin theme since I was making tres leches cake. My sister-in-law made a yummy tortilla casserole with random stuff like beans, zucchini, and cheese. My mom made her signature guacamole, my dad made mojitos, and my sister brought salad. It wasn't a big thing, but it was still nice.

The cake.
For the tres leches recipe, follow this link.

Monday, February 21, 2011

Funk Betty Balls


Colorful Yumminess
That's right. Funk Betty Balls. Okay, so a little back story here. Way back when, at some time, my mom misheard either my sister or me saying "funfetti," as in funfetti cake, so she thought we said "funk Betty." Mind you, my mom mishears a lot of things. She also likes to make up words. Like schnoll. I'm still not sure what a schnoll is, but pretty sure it came out of a guessing game (as in, someone may have been drawing a schnoll). Anyway, it makes for a pretty good family inside joke. Or a band name.
Anyway, so this week I set out to make cake balls. I had heard about them for some time and tried some really good pumpkin ones back in the fall. I knew I wanted to make my mark by making them with funfetti cake mix and frosting. Who doesn't like funfetti? They're so colorful and magical, and look perfect for a celebration. But I'm not celebrating anything except the awesomeness that is existence.

I have to say, my Funk Betty Balls were quite a success, if by success, me eating several throughout the day counts. But my nephew scarfed one down and my coworkers seemed to appreciate them.

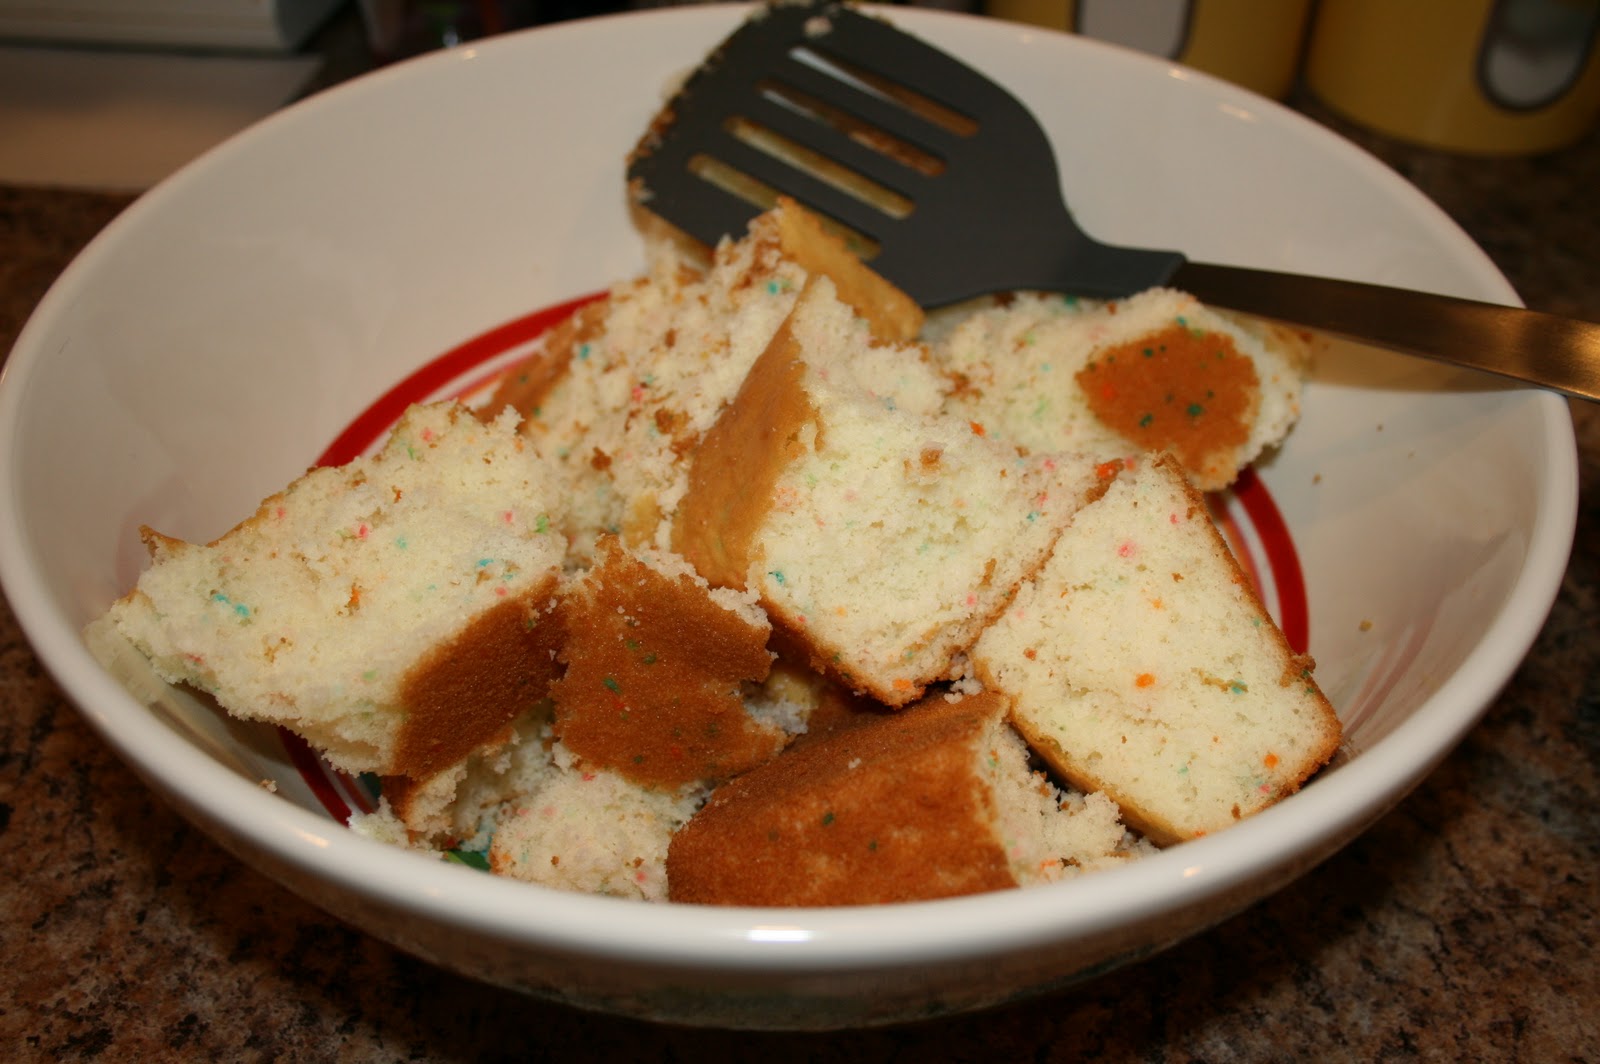
The Funk Betty Balls were actually pretty easy to make, no need for a recipe, really. Here's what you do:

1. Make a box cake mix according to the package, baking it in a 13x9-inch pan.

Cut into the cake

The Cake in the Bowl
2. After the cake has cooled, crumble it up in a large mixing bowl. Dump 1 tub of frosting into the cake crumbles. Mix together with a spatula, then cover and freeze for about an hour, or until scoopable.

The cake and frosting mixture. Appetizing...
3. Scoop the cake mixture into 1-tbsp sized balls. I used a small cookie scoop. Place the balls on a parchment-lined baking sheet and freeze for about an hour or until fairly cold and solid.
Balls in the freezer.
4. When it is almost time to pull the balls out of the freezer, melt some white chocolate or dark chocolate in a double boiler. If melting white chocolate, make sure to keep a very close eye on it, stirring constantly, and make sure it does not burn.

5. Pull the balls out of the freezer and, one at a time, dip into the melted chocolate. I used two forks for dipping and still found it to be very messy. Place the balls back on the parchment. Sprinkle sprinkles on top of the balls right away if using.

Pretty Little Funk Betty Balls!
6. Put the sheet of balls into the fridge to harden before transferring to a plate or some reusable containers. I keep the balls in my fridge so they don't get melty.


Enjoy!
I covered some in semisweet chocolate after running out of white chocolate.

Monday, November 8, 2010

An Afternoon Tea with Buttermilk Chocolate Chip Crumb Cake

Ah, afternoon tea. It's one of my favorite things. Nothing feels more special and relaxing than sitting down to a nice spread of food and hot tea. I've been doing afternoon teas for several years now, usually with my sister or sister-in-law. On a good day, every one's here for tea.

I know some people may have their reservations about afternoon tea. It does sound awfully fancy and hoity-toity. But it's not! Sometimes it is, and though I like it that way, I know far too many people who don't. Afternoon tea at home is much more, well, homey. I usually whip up whatever I can by way of sandwiches and try to bake some sort of scone or cake. We do use fancy tea cups, but none of the dishes match. We even use fancy little tea spoons, but that just makes it fun. Even my nephew wanted in on the tea fun!

So today's spread featured a smoked salmon and potato galette, asiago cheese bread, sweet potato cupcakes, and a buttermilk chocolate chip crumb cake. The tea was a vanilla rooibus. All was delicious.

Buttermilk Chocolate Chip Crumb Cake
from Chocolate Chocolate by Lisa Yockelson

Butter Crumb Topping
1 1/2 cups all-purpose flour
3/4 cup granulated sugar
3/4 cup packed light brown sugar
1/8 tsp salt
1 1/2 sticks cold unsalted butter, cut into chunks
2 tsp vanilla extract

Buttery Buttermilk-Chocolate Chip Batter
2 1/2 cups all-purpose flour
1/2 cup bleached cake flour
1 1/2 tsp baking powder
1/2 tsp baking soda
1 tsp salt
1 1/2 cups miniature semisweet chocolate chips
2 sticks unsalted butter, softened
1 3/4 cups superfine sugar
3 lg eggs
2 1/2 tsp vanilla extract
1 cup buttermilk
3/4 miniature chocolate chips, for sprinkling on top of the baked cake
Confectioners' sugar, for sifting over the baked cake

Preheat the oven to 350 degrees F. Lightly grease and flour a 13 by 9 in. pan.

Make the topping. Thoroughly mix the flour, granulated sugar, light brown sugar, and salt in a large mixing bowl. Drop in the chunks of butter and, using a pastry blender, cut the fat into the flour until reduced to small pieces about the size of large pearls. Sprinkle the vanilla extract over. With your fingertips, knead the mixture together until moist, clumpy lumps are formed.

Mix the batter. Sift the dry ingredients (flour through salt) onto a sheet of wax paper. In a small bowl, toss the chocolate chips with 1 1/2 tsp of the sifted mixture.
     Cream the butter in the large bowl of a stand mixer on medium speed for 3 minutes. Add the sugar in 3 additions, beating for 1 minute after each portion is added, then beat another minute. Blend in the eggs, one at a time, beating for 45 seconds after each addition. Mix in the vanilla extract. On low speed, alternately add the sifted mixture in 3 additions with the buttermilk in 2 additions, beginning and ending with the sifted mixture. Scrape down the sides of the bowl frequently to keep the batter even-textured. Stir in the chocolate chips.
     Spoon the batter into the prepared pan and spread evenly. Smooth the top with a rubber spatula.
     Sprinkle the streusel topping evenly over the cake batter, taking care to cover the four corners and long edges. Use all of the topping- the covering will be generous.

Bake and cool the cake. Bake the cake in the preheated oven for 1 hour, or until risen, set, golden, and a toothpick inserted in the center comes out clean.
     Place the pan on a rack. Immediately sprinkle the 3/4 cup chocolate chips on top of the cake. Cool completely.   
     Sift confectioners' sugar lightly over the top of the cake just before cutting into fingers or squares directly from the pan.

Note: this cake is very sweet, so the powdered sugar is optional- it looks pretty, but can be a bit too much.

Saturday, September 11, 2010

Wellesley Fudge Cake

Ah, at last I have made Wellesley Fudge Cake. It all began last year when I was perusing my mom's new issue of Cook's Country and I saw a picture of an absolutely delicious-looking chocolate cake. I read the accompanying story and recipe- it was a Wellesley Fudge Cake. Apparently back in the early 1900's fudge was contraband at Wellesley, and therefore students would have secret fudge-making parties. I think that if college kids of my generation were sneaking off to make fudge, I may have fit in a little better with my peers... Anyway, this cake came about because tea parlors in the area started making fudge cake et voila! Wellesley Fudge Cake.

Fast forward to two weeks ago, I was discussing potential birthday cake with Frakah (my birthday is at the end of October), and remembered Wellesley Fudge Cake, but could not remember where I had seen the recipe. I knew it was in a Cook's Country or Cook's Illustrated, but I had quite a stack to sort through in order to find it. When I did find it you can believe I was very, very happy.

Fast forward once more to this weekend when I had extra time on my hands to bake a cake. I was soooooo excited to finally bake it and (most of all) to try it. The cake itself was easy to make, though when I turned the pans out on to the racks to cool, some of the cake stayed in the pan (next time I will use parchment paper at the bottom) and I accidentally broke one of the cakes (though it was warm enough I  could kind of push it together).

The frosting proved rather tricky- the sort of caramelization process was a bit prolonged for me. The butter, evaporated milk and sugar just did not seem to thicken as quickly as the recipe said it should. It's also a bit more strenuous to whisk the powdered sugar into the thick fudge, and then the frosting had to cool to room temperature, stirring occasionally (which meant more tiring whisking). Frosting the cake was slightly easier than most cake, though I think I broke another piece of cake in the process (we'll never know for sure because the frosting covered, but let's just say my cake looked like it had a tumor on one side).

The end result was delicious and worth the work. It was chocolaty, fudgy and sweet. Very sweet, actually. It definitely pairs well with vanilla ice cream. My younger brother and his wife heated their slices of cake in the microwave (cake is stored in the fridge), and they said it was awesome that way. All I can say is, I'm quite happy with my chocolate cake.