Pages

Showing posts with label chocolate. Show all posts

Sunday, January 29, 2012

Chocolate Cake with Chocolate Frosting (because they don't make band-aids for your heart)

Mmm...nice and round...
Happy New Year! A little late, I know, but I've been busy. Actually, I was sick there for awhile. First it was shingles, which kept me away from my nephews. Sadly, my newest nephew decided to arrive right when I was at my most contagious, so I had to wait a week to meet him. But meet him I did, and he's as sweet as can be.

Normally I start out every new year with some grand resolution, something to bring about fantastic change in my life. Given that last year's aspirations failed miserably, this year I decided to go a little more low-key. My only resolutions this year are to just stay true to myself, and live a story worth telling. It turns out that living a story like that means ignoring what other people say is the right or acceptable way to do things. So I'm going to do things my way, and if I offend anyone in the process, then they don't belong in my story.

This year, I am going to throw everything I have into the universe. I'm interested to see what I get in return. On that note, I offer the universe this chocolate cake. It doesn't necessarily mend a broken heart, but it does soothe it a little. It's a simple and easy to make chocolate cake. Light, fluffy, and moist, with a sweet, chocolatey frosting. The kind of cake you can eat a large slice of without feeling terribly guilty afterward.

Slice of awesome.
Chocolate Cake
from the back of the Hershey's Cocoa can

2 cups sugar
1 3/4 cup all-purpose flour
3/4 cup natural cocoa powder
1 1/2 tsp baking powder
1 1/2 tsp baking soda
1 tsp salt
2 eggs
1 cup milk
1/2 cup vegetable oil
2 tsp vanilla extract
1 cup boiling water

Preheat the oven to 350 degrees F. Grease and flour two 9-inch round baking pans.

Combine the dry ingredients in the bowl of a stand mixer and mix until blended. Add the eggs, milk, oil, and vanilla (which I forgot...) and beat on medium speed for 2 minutes. Stir in the boiling water and pour into the prepared pans.

Bake for 30-35 minutes, until the cake springs back when lightly touched and a toothpick inserted in the center comes out clean. Cool for 10 minutes, then turn onto wire racks to cool completely.

Chocolate Frosting
from the back of the Hershey's Cocoa can

1 stick unsalted butter, softened
2/3 cup natural cocoa powder
3 cups powdered sugar
1/3 cup milk
1 tsp vanilla extract

Melt the butter in a small saucepan over low heat. Pour the butter into the bowl of a stand mixer and beat in the cocoa. Alternately add the powdered sugar and milk until smooth and fluffy, with the mixer on medium speed. Stir in the vanilla. Frost and serve.

Enjoy!

Don't you want me, baby?

Saturday, December 31, 2011

Racines Cake for Christmas Eve

Mmmm...chocolate...
Welcome to my last post of 2011, a year that shall go down in (my) history as one of my least favorites. It was filled with anxiety, depression, heartache, disappointment, loneliness, and frustration. True, there were a few upsides (trip to Paris, anyone?), but in all, it was a year I wouldn't mind forgetting.

So instead of reflecting on the year that was, I would like to look forward to the year that will be. Granted, I started of 2011 with a great deal of optimism for what was sure to be a great year to come, but I am certain that 2012 has better things in store for me than 2011. I am hoping that my falling apart in 2011 only created an opportunity for me to put myself back together in a more fabulous shape in 2012.

So, in parting with 2011, I leave you with a recipe for a most delicious and simple chocolate cake. I wish I had thought to pair it with a peppermint whipped cream, since I served it on Christmas Eve, but it was just as delicious with the orange flower-scented whipped cream that I made. For me, this cake was simply perfect: light, chocolatey, and decadent. Fancy enough for a celebration, but simple enough to pull together in a pinch.

So fancy!
Racines Cake
from Ready for Dessert

10 oz bittersweet chocolate (I used 70%), chopped
1 stick unsalted butter, cut into pieces
1 tbsp freshly brewed espresso
1/2 tsp vanilla extract
6 lrg eggs, at room temp
1/4 cup plus 2 tbsp granulated sugar
2 tbsp cocoa nibs

Preheat the oven to 350 degrees F. Prepare a 9-inch springform pan by buttering it and dusting it with cocoa powder.

In a large heatproof bowl, combine the chocolate, butter, and espresso and melt over a pan of simmering water. Stir until smooth, then remove from the heat and add the vanilla.

In a smaller bowl, combine the egg yolks and 1/4 cup sugar and beat on medium-high speed with a hand mixer until the mixture is light and creamy, about 1 minute.

In a clean, dry medium-sized bowl, beat the egg whites on low speed until they begin to hold shape. Add the 2 tbsp sugar and beat on high speed until the whites hold soft peaks.

Fold the egg yolks into the chocolate mixture, then fold in half of the egg whites. Carefully fold in the remaining whites until there are no streaks of white- don't overfold!

Scrape the batter into the prepared pan, then sprinkle the cocoa nibs evenly over the top. Bake until the cake is barely set in the center, abut 25 minutes. Let cool completely.

Enjoy!

Wednesday, August 17, 2011

Emergency Chocolate Cake

Sorry, this is the only picture I got; I was a bit excited about eating the cake...
So my blog has been on hiatus for a few weeks, mostly because I did not bake any new recipes. Okay, so that's not entirely true- I did make some muffins, but they weren't good enough to write about. Instead, I made coffee ice cream and my famous chocolate chip cookies because I was in the mood for something familiar.

But I'm back with a recipe for Emergency Chocolate Cake from Cook's Illustrated. I'd been feeling a bit of the summertime blues last week, so I figured an easy chocolate cake was what the doctor ordered. While the cake did not actually fix anything, it got me back in the baking spirit. It was also delicious.

No, what really is really helping me right now is a reminder from one of my best friends. I remember feeling this way when I studied abroad, and I told my friend about it. She reminded me that I got through that time, had the best time of my life after it, and if it were not for that, we would not be such good friends. Sometimes you need a friend who has been there for you before to remind you of just how strong you are. So I'm back. And I want to share a poem that has been playing in my mind today: Invictus.

Emergency Chocolate Cake
adapted from Cook's Illustrated


7.5 oz unbleached all-purpose flour
7 oz sugar
1/2 tsp baking soda
1/4 tsp sea salt
2 oz Dutch-processed cocoa powder
2 oz bittersweet chocolate, chopped fine
1 cup hot coffee
2/3 cup mayonnaise
1 lrg egg
2 tsp vanilla extract

1. Adjust oven rack to middle position, preheat oven to 350 degrees F, and coat an 8x8-inch baking dish with nonstick cooking spray.

2. Whisk the dry ingredients together in a large bowl. In a medium bowl, combine the chocolate and cocoa powder, then pour the hot coffee over it and whisk until smooth; let cool. Whisk in the remaining ingredients. Stir the wet ingredients into the dry ingredients and stir until combined.

3. Pour the batter into the prepared baking dish and bake for about 30 minutes, or until a toothpick inserted in the center of the cake comes out clean.

4. Allow cake to cool on wire rack. The cake can be eaten plain, or served with ice cream.

Sunday, May 29, 2011

The Ultimate Comfort: Ice Cream and Brownies

Oh, brownies.
More brownies? Yes. Yes, more brownies. I cannot get enough of brownies. Brownies are one treat I tend to have no problem polishing off. That's not to say I don't feel bad about polishing off a pan of brownies, I just accept that guilt is a main ingredient in brownies and figure that the pleasure of brownies far outweighs the guilt. For example, it is now 2:30pm and I have already had two brownies today. I'm feeling only a little bit guilty about that fact. These brownies are so good... I feel like I'm becoming a brownie master.

Look at that gooey caramel.
I don't usually need a reason to bake brownies, but I guess I kind of had a reason to bake them this week. If ever I've got a minor (or even major) case of the blues, brownies are my go-to. When my grandmother died my senior year of college, one of my best friends came over armed with brownie-mix and Hitchcock movies. Though it didn't entirely take the pain of loss away, it helped for a little while. I know that seeking comfort from food is not entirely healthy, but given that I'm healthy overall, I don't see the harm in it. Life is too short to not do things that make you happy. And making (and eating) brownies makes me happy.

Mmm, so good.
As for the ice cream, I had leftover whole milk and cream in my fridge that needed used up before their expiration dates, so I felt like I simply had to make ice cream. I decided that I wanted to do a vanilla base with candy added, and I thought that Butterfingers would be pretty awesome. I was totally right on that point.

I'm not entirely sure why, but I guess I was feeling pretty candy-inspired this week because I also added candy bars to my brownies. For these, I wanted peanut butter and caramel, so I added a broken-up king-size peanut butter bar and a chopped-up Cadbury caramel bar. These additions make for intensely sweet brownies, but served with ice cream and a glass of water, it's overall quite satisfying.

Sweet, heavenly goodness.
Butterfinger Ice Cream
adapted from Vanilla Ice Cream in The Perfect Scoop


1 cup whole milk
3/4 cup sugar
2 cups heavy cream
Pinch of salt
1 tsp vanilla extract
6 lrg egg yolks

2 regular-size Butterfingers

Warm the milk, sugar, 1 cup of the cream, and salt in a medium saucepan.

Pour the remaining 1 cup cream into a large bowl and set a mesh strainer on top. In a separate medium bowl, whisk together the egg yolks. Slowly pour the warm mixture into the egg yolks, whisking constantly, then scrape the warmed egg yolks back into the saucepan.

Stir the mixture constantly over medium heat with a heatproof spatula, scraping the bottom as you stir, until the mixture thickens and coats the spatula. Pour the custard through the strainer and stir it into the cream. Let cool.

Chill the mixture thoroughly in the refrigerator. Freeze the mixture in your ice cream maker according to the manufacturer's instructions. While the ice cream is churning, chop the Butterfingers so that you have small crumbles and some larger chunks (no bigger than hazelnut-size). At the last minute, pour the Butterfinger bits into the ice cream machine as it is churning. Remove the ice cream from the machine and place in a freezer-safe container.


Straight from the pan.
Candy Bar Brownies
adapted from The Perfect Scoop

1/2 cup unsalted butter, cut into pieces
4 oz unsweetened chocolate, cut into small pieces
1 1/4 cups sugar
2 lrg eggs
1 tsp vanilla extract
1/2 cup flour
1/8 tsp salt

2 large candy bars of choice

Preheat the oven to 350 degrees F.

Line an 8-inch square pan with a long sheet of aluminum foil that covers the bottom and reaches up the sides. Grease the bottom and sides of the foil with nonstick cooking spray.

Melt the butter in a medium saucepan. Add the chocolate pieces and stir constantly with a whisk over very low heat until the chocolate is melted.

Remove from the heat and stir in the sugar, then the eggs one at a time, and the vanilla. Stir in the flour and the salt. Beat the batter vigorously for 30 seconds, until it begins to form a smooth ball. 


Cut the candy bars into chunks (about 1-inch squares). Add the candy to the brownie batter and stir until evenly combined.

Scrape the batter into the prepared pan, smooth the top, and bake for 30 minutes, until the center feels just about set. Remove from the oven and let cool.


Enjoy!

Sunday, May 8, 2011

Something Special

Oh so pretty and fancy-looking.
By now you should know that I've been on an ice cream kick lately. Making ice cream is a lot of fun and very rewarding. I knew I wanted to make another ice cream, but I wanted to take it one step further and make something really special.

Every now and then, I like to make something special just because. Mostly because it makes me feel good. It makes me feel especially good to come up with an idea and make it into reality. But I also like to treat myself. Hey, I'm a single girl, so I'm aloud to make myself feel special once in awhile. Though, I must say, my nephew made me feel pretty special today. He gave me a card for mother's day because even though I'm not a mother, I'm a pretty cool aunt. But also, he gave me a hug and kiss goodbye because he wanted to make me happy.

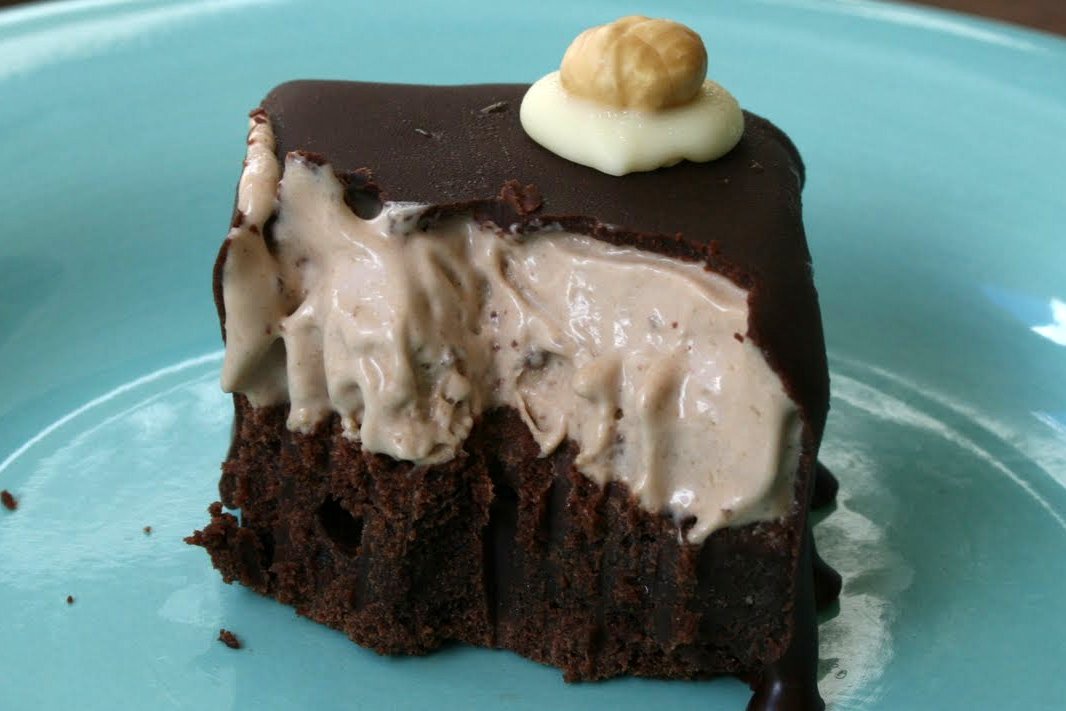
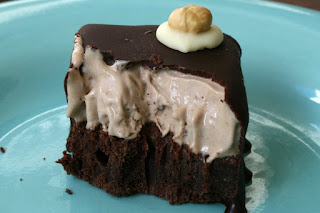
So, for my special treat, I knew I wanted to make a chocolate hazelnut ice cream. In addition, I wanted to involve a brownie. I also thought about chocolate-dipped ice cream, so I came up with an idea for a brownie base with hazelnut ice cream on top, enrobed in bittersweet chocolate, and topped with a little white chocolate and a roasted hazelnut.

The execution of this dessert was somewhat tricky. Next time, I will use a softer chocolate cake recipe, as the frozen brownie is a bit hard to get through (though mighty tasty). The hazelnut ice cream is incredibly addictive. Seriously. I could just sit there and eat all of it in one sitting. But my willpower is much stronger than that, thankfully.

So, without further ado, here is my recipe for a very lovely dessert. This is one I'll keep in my back pocket for the future, when I want to make something extra special for someone.
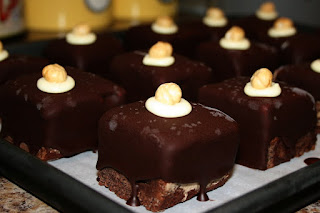
A little frostbitten, but still pretty.
Gianduja Gelato
from The Perfect Scoop

1 1/2 cups hazelnuts, toasted
1 cup whole milk
2 cups heavy cream
3/4 cup sugar
1/4 tsp coarse salt
4 oz milk chocolate, finely chopped
5 lrg egg yolks
1/8 tsp vanilla extract

Roast the hazelnuts in the oven at 350 degrees F for about 10 minutes, stirring once or twice. Remove the hazelnuts from the oven and rub them in a kitchen towel to remove as much of the skins as possible, then finely chop them in a food processor.

Warm the milk with 1 cup of the cream, sugar, and salt in a saucepan. Once warm, remove from the heat and add the chopped hazelnuts. Cover and let steep at room temperature for 1 hour.

Put the milk chocolate pieces in a large bowl. Heat the remaining 1 cup cream in a medium saucepan until it just begins to boil. Pour it over the milk chocolate pieces and stir until the chocolate is completely melted and smooth. Set a mesh strainer over top.

Pour the hazelnut-infused milk through a strainer into a medium saucepan, squeezing the nuts firmly with your hands to extract as much of the flavorful liquid as possible. Discard the hazelnuts.

Rewarm the hazelnut-infused mixture. In a separate medium bowl, whisk together the egg yolks. Slowly pour the warm hazelnut mixture into the egg yolks, whisking constantly, then scrape the warmed egg yolks back into the saucepan.

Stir the mixture constantly over medium heat with a heatproof spatula, scraping the bottom as you stir, until the mixture thickens and coats the spatula. Pour the custard through the strainer and stir it into the milk chocolate mixture. Add the vanilla and let cool.

Chill the mixture thoroughly in the refrigerator, then freeze it in your ice cream maker according to the manufacturer's instructions.

Chewy-Dense Brownies
from The Perfect Scoop

1/2 cup unsalted butter, cut into pieces
4 oz unsweetened chocolate, cut into small pieces
1 1/4 cups sugar
2 lrg eggs
1 tsp vanilla extract
1/2 cup flour
1/8 tsp salt

Preheat the oven to 350 degrees F.

Line an 8-inch square pan with a long sheet of aluminum foil that covers the bottom and reaches up the sides. Grease the bottom and sides of the foil with nonstick cooking spray.

Melt the butter in a medium saucepan. Add the chocolate pieces and stir constantly with a whisk over very low heat until the chocolate is melted.

Remove from the heat and stir in the sugar, then the eggs one at a time, and the vanilla. Stir in the flour and the salt. Beat the batter vigorously for 30 seconds, until it begins to form a smooth ball.

Scrape the batter into the prepared pan, smooth the top, and bake for 30 minutes, until the center feels just about set. Remove from the oven and let cool.

Chocolate Coating
adapted from the Tartufi recipe in The Perfect Scoop

8 oz bittersweet chocolate, chopped
8 tbsp unsalted butter, cut into pieces
2 tbsp corn syrup

Melt the chocolate, butter, and corn syrup in a medium bowl placed over a pan of simmering water, stirring constantly.
Enjoy!
To assemble my dessert:
1. Spread the freshly-churned ice cream over top of the brownies in the pan. You will not use all of the ice cream. Place in the freezer until firm.
2. Cut the brownie/ice cream combo into 16 pieces. This will be difficult as the brownies will be hard. Place these pieces on a line baking sheet, then place in the freezer until firm.
3. Dip the brownie pieces into the chocolate coating, then place back on the baking sheet and stick it back in the freezer until set.
4. Melt a little bit of white chocolate in the microwave, then spoon little dollops on top of the brownie pieces, placing a peeled roasted hazelnut on top. This makes it look fancy.

Note: This was a very messy and time-consuming process, but the end result was worth it. At one point, I though the brownies were to hard and it would not turn out, but I think they're at least beautiful. Plus, if you let the desserts thaw a little, the brownies part isn't so hard.

Monday, May 2, 2011

Double Chocolate Ice Cream for My Mom's Birthday

Chocolate Yumminess
This weekend we celebrated my mom's birthday, and she requested that I make her ice cream. She really didn't have to twist my arm on this one. I've been on an ice cream kick lately, and was excited to try out a different chocolate ice cream recipe.


Gloppy

Before I delve into the ice cream, however, let me take a minute to talk about my mom. I never give her enough credit, but she is a good mom. Whenever I'm sick, she's there, either making me toast or bringing me Jamba Juice. When I had to have my gallbladder removed, my mom was there at the hospital with me, holding my hand until the doctor wheeled me away. She was also there when it was time to put my old dog Ducky down and I wasn't strong enough to go into the vet's office. But my mom isn't just there when things are down. I have also had some great times with my mom, like riding the Rockin' Roller Coaster at Disney World on Mother''s Day, or travelling Scotland and Ireland together. My mom is also a loyal supporter of my bellydancing, and has sewed two costumes for me. In fact, my mom has sewed many costumes for me since I was a little girl. So, when my mom asked me to make ice cream for her, it was a no-brainer.

Now for the ice cream. It is creamy. It is chocolaty. It is a little bit crunchy. Simply put, it is delicious. It is chocolate stracciatella ice cream. For those of you not in the know, stracciatella is an Italian thing. When you go to my favorite gelato shop in Rome (the one with over 100 flavors), you will see several stracciatellas. Standard stracciatella is sweet cream gelato with ribbons of chocolate in it. I decided to make a bittersweet chocolate ice cream with ribbons of semi-sweet chocolate. My mom loves chocolate ice cream, so I figured this would be perfect. And it was.


Churning...
 Chocolate Ice Cream
from The Perfect Scoop

2 cups heavy cream
3 tbsp unsweetened Dutch-process cocoa powder
5 oz bittersweet chocolate, chopped
1 cup whole milk
3/4 cup sugar
Pinch of salt
5 lrg egg yolks
1/2 tsp vanilla extract

Warm 1 cup of the cream with the cocoa powder in a medium saucepan, whisking to thoroughly blend the cocoa. Bring to a boil, then reduce the heat and simmer at a very low boil for 30 seconds, whisking constantly. Remove from the heat and add the chopped chocolate, stirring until smooth. Then stir in the remaining cream. Pour the mixture into a large bowl, scraping the saucepan as thoroughly as possible, setting a mesh strainer on top of the bowl.

Warm the milk, sugar, and salt in the same saucepan. In a separate medium bowl, whisk together the egg yolks. Slowly pour the warm milk into the egg yolks, whisking constantly, then scrape the warmed egg yolks back into the saucepan.

Stir the mixture constantly over medium heat with a heatproof spatula, scraping the bottom as you stir, until the mixture thickens and coats the spatula. Pour the custard through the strainer and stir it into the chocolate mixture until smooth, then stir in the vanilla.

Chill the mixture thoroughly in the refrigerator, then freeze it in your ice cream maker according to the manufacturer's instructions.

Enjoy!
Stracciatella
from same book as above

5 oz semisweet chocolate, chopped

Melt the chocolate in a liquid measuring cup by zapping it in the microwave at 30-second intervals. I think mine took about 1 minute total. At the very last second of churning the ice cream, drizzle in the melted chocolate in thin streams, making sure not to get chocolate on the dasher. You can also spoon some into the ice cream as you layer it in a plastic container, making sure to break up the chunks.

Sunday, April 3, 2011

Irish Coffee Trifle, Dessert of the Gods

Ooh, pretty, wow...
A trifle is a wonderful thing. What's funny is if you look up the definition for trifle, you will find that it means "an article or thing of very little value." This definition could not be further from what I believe a trifle to be. Either the name of the dessert needs to change, or the definition of the word trifle does. To me, a trifle is a dessert of the utmost value. A trifle is what you serve when you have a fancy party. Or a family get-together, in this case.

I sneak a bite and nephew eyes his next spoonful.
Sunday evening brought yet another family dinner for my crazy clan. Mom had us make our own pizzas, and I brought this Irish Coffee Trifle for dessert. I had the idea because I still had all of the ingredients for the Irish Coffee Cupcakes, I had all the ingredients for some chocolate pudding (not to mention whole milk that needed to be used up), Irish Cream liqueur, and some whipping cream that needed to be used. All of this sounded to me like the makings of a trifle.

Served up nice and pretty.
What I love about trifle is that it is pretty difficult to mess up. As long as you have some good cake, a good pudding, and some whipping cream, you can pull together a trifle. I also love how it allows me to be creative. I can use any cake, any custard, any liqueur- heck, I could even add fruit or candy if I wanted! The possibilities are endless!

I will eat the whole thing if nobody stops me.
To make my trifle, I used my Irish Coffee Cupcake recipe (just the cupcakes), my chocolate pudding recipe (the good one), some leftover ganache from the Irish Coffee Cupcakes (melted), and some whipping cream. To make the whipping cream, I beat about 1 1/2 cups of heavy cream with 3 or 4 teaspoons of white sugar on high speed with a hand mixer until stiff peaks formed.

The lineup.
To assemble the trifle, I started with 6 of the cupcakes, quartered, and broke them up and laid them in the bottom of my trifle dish. Next, I sprinkled 4 teaspoons of Irish Cream liqueur over the cake, and dropped some globs of melted ganache on top of that. Next, I spread half of my pudding over top of the cake layer. Then, I spread half of the whipped cream on top of the pudding. I then repeated the whole process with the cake, liqueur, ganache, pudding, and whipped cream. Finally, I used a vegetable peeler to shave some semi-sweet chocolate on top of the trifle to make it look fancy. I think I succeeded.
You know you want some...

Sunday, March 20, 2011

Irish Coffee Cupcakes and the Girl Who Just Doesn't Give In

Irish Coffee Cupcakes
One of my mottoes is "never give up, never give in." It's really hard to follow sometimes, especially if I've been hurt or swallowed by the ocean (don't worry, I made it back to the surface). But then there are the times when I want what I want and nothing is going to stop me. Usually these things I want are not worth it in the grand scheme of things, but for some reason, little me has assigned it the utmost importance.

One such instance happened when I was in third grade. I'm still not entirely sure if this story is true, but I'm pretty sure it is. I remember it as if it happened last year. It was a Wednesday and I woke up with a fever. My mom told me I should stay home from school, but I refused because we had a spelling test that day and there was a signed piece of paper we had to turn in from our parents and if we did so, we would get a homework pass. I lived for getting homework passes- they meant I could skip a homework assignment. Score! So, I went to school, did my spelling test, got my homework pass, and made it to gym class. In gym I really started to feel sick, so the teacher sent me to the nurse who called my mom to come pick me up. Well, at least I'd gotten what I came for. But I really hated missing school.

I spent the next few days in a haze- I was dizzy every time I sat up on the couch. One day, maybe Friday, my younger brother came home from school and told me a killer clown had been at the school that day. Now, I grew up never really trusting the words that came out of my little brother's mouth- he was a bit of a fabulist. So naturally, I thought this story was being told just to freak me out. Besides, how outrageous is that? A killer clown at my school?

A single cupcake
Come Monday I was feeling better, so I went back to school. On the bus ride to school, all that the other kids were talking about was the killer clown. Wait a second... Is this some big prank? Surely my brother isn't that good... Rumor had it that the clown had chased a boy down the hall outside my classroom with a dagger. I resolved to get to the bottom of this as soon as I got to class. When I got there, all the kids were talking about the killer clown. So I asked my teacher if it was true. She said that we shouldn't talk about it any more, but from then on we were allowed to take a buddy to the restroom, just to be safe. Are you kidding me?!

So that is the story of the killer clown and the days I was too incapacitated to go to school. I never did use that homework pass- I moved later that Spring. I feel like I was sick for a reason that week. As in, maybe I was not supposed to be at school those few days. Maybe it would have traumatized me (I am an HSP, after all).

Anyway, what does this story have to do with Irish Coffee Cupcakes? Well, I was sick all this week. I had a head cold that really knocked me out. I haven't slept this much since my last trip to London. I also had a Game Night scheduled at my place Saturday night, and I was not about to give it up. I had already said I would provide the above-mentioned cupcakes, and I was not about to let anyone down. Mostly I was stubborn and really wanted to socialize and make awesome cupcakes. So I did.


Sickly cupcakes

These cupcakes are the bomb (why yes, I'm going back to the 90s with that one). When I poured the batter into the prepared liners, I was a bit worried because it was terribly lumpy. When the cupcakes came out of the oven, I was horrified because they looked like they had cancer or something. The lumps looked awful. Luckily, I got to cut holes in the cupcakes to fill with filling, and then I glazed them with chocolate. So you can't see the lumps on the finished product. And the finished product was damn tasty. Even my fellow game-nighters agreed with me on this one.


Irish Coffee Cupcakes
from Ready for Dessert by David Lebovitz

Cupcakes
175 g all-purpose flour
1 tsp baking powder
1/4 tsp baking soda
1/4 tsp salt
250 ml strong-brewed coffee
50g Dutch-processed cocoa powder
1 stick unsalted butter, cut into pieces, at room temp
275 g light brown sugar
2 lrg eggs, at room temp
2 tsp vanilla extract

Filling
4 oz cream cheese, at room temp
4 tbsp salted butter, at room temp
75 g powdered sugar
1 tbsp + 1 tsp Irish Cream Liqueur (I used Carolans, per recommendation from the lady at the liquor store)

Glaze
4 oz chopped bittersweet chocolate
1/4 cup heavy cream
2 tsp light corn syrup
2 tbsp whiskey (I used Jameson)

     Preheat the oven to 350 degrees F. Line a standard 12-cup muffin tin with cupcake liners.
     To make the cupcakes, into a small bowl, sift together the flour, baking powder, baking soda, and salt.
     In a medium saucepan, heat the coffee until almost boiling. Remove from the heat and whisk in the cocoa until dissolved, then add the stick unsalted butter, stirring until melted. Whisk in the brown sugar and let cool until tepid. Whisk in the eggs and vanilla, then stir in the flour mixture, mixing just until incorporated. Don't overmix.
     Divide the batter among the cupcake liners and bake until the cupcakes feel just set in the center, 20 to 22 minutes. Let cool completely.
     To make the filling, in a food processor fitted with a metal blade, beat together the cream cheese, salted butter, and powdered sugar until smooth. Beat in the Irish Cream liqueur.
     To fill the cupcakes, use a sharp knife to cut a 2-inch cone-shaped hole in the center of each cupcake. Remove the plug-like pieces. Trim off the top of each plug to create a disk-shaped piece that is 1/3 inch thick. Save these disks for capping the filled cupcakes.
     Divide the filling among the cupcakes, then gently press the caps into the filling. They won't fit perfectly, which is fine, and some filling may bulge out.
     To make the glaze, melt the chocolate with the cream and corn syrup in a small saucepan over low heat, stirring until smooth. Remove from the heat and stir in the whiskey.
     Dip the tops of the filled cupcakes in the glaze, completely sealing the tops and generously coating them. Let cool, right side up, until the glaze is firm.

Enjoy!


 Note: I put the filling in a sandwich baggie and cut off a tip to squeeze the filling into the holes in the cupcakes. Made it pretty easy and less messy.

Thursday, February 24, 2011

Snow Day Brownies

Snowy Perfection
Let me begin by saying I do not completely trust weather reports. I feel rather jaded by all of the false reports of inclement weather over the years. Perhaps that is just the nature of meteorology in the good ole Pacific Northwest. It goes without saying that I was feeling rather doubtful about the prediction for snow this Thursday. Imagine my pleasant surprise when I woke up Thursday morning and peeked through the blinds of my bedroom window to see powdery white stuff everywhere. It had snowed! As predicted!

Granted, I live in a bit of a weather vortex, so snow was not covering the entire metro area, but my metro area was covered in snow. And it was pretty. My dog, Lucy, seemed a little skeptical. It was her first legitimate snow, so she didn't know what to make of it. When chunks of snow came off of her fur when we got inside, she decided snow was quite tasty.

Anyway, snow meant I was not going in to work. I had a bad experience last year when my car stalled and ran me into a curb and then I was stranded at the library for an hour before being rescued, so I just do not take any risks with the weather. My life is worth more than a day's work, if you ask me. So, since I did not go into work, I stayed in and got some cleaning done, watched this week's Glee, and made brownies. I've been needing brownies for awhile, so it was good to finally satisfy my craving.

Boy, am I satisfied. These brownies are bomb. Really. They have that indescribable quality that only really good fudgy brownies have. I am of the belief that if it is not fudgy, it is not a brownie. I'm in fudgy heaven as we speak. Perfect for a cold white day like today. :)


Fudgy!

The Baked Brownie
from Baked: New Frontiers in Baking

1 1/4 cups all-purpose flour
1 tsp salt
2 tbsp dark unsweetened cocoa powder
11 oz dark chocolate (60-72%), coarsely chopped
1 cup unsalted butter, cut into 1-inch pieces
1 tsp instant espresso powder
1 1/2 cups granulated sugar
1/2 cup firmly packed light brown sugar
5 lrg eggs, at room temp
2 tsp pure vanilla extract

Preheat the oven to 350 degrees F. Butter the sides and bottom of a 9x13-inch pan.

In a medium bowl, whisk the flour, salt, and cocoa powder together.

Put the chocolate, butter, and instant espresso powder in a large bowl and set it over a saucepan of simmering water, stirring occasionally, until the chocolate and butter are completely melted and smooth. Turn off the heat, but keep the bowl over the water and add the sugars. Whisk until completely combined, then remove the bowl from the pan. The mixture should be room temperature.

Add 3 eggs to the chocolate mixture and whisk until combined. Add the remaining eggs and whisk until combined. Add the vanilla and stir until combined. Do not overbeat the batter at this stage or your brownies will be cakey.

Sprinkle the flour mixture over the chocolate mixture. Using a spatula (not a whisk), fold the flour mixture into the chocolate until just a bit of the flour mixture is visible.

Pour the batter into the prepared pan and smooth the top. Bake in the oven for 30 minutes, rotating the pan halfway through the baking time, until a toothpick inserted into the center of the brownies comes out with a few moist crumbs sticking to it. Let the brownies cool completely, then cut them into squares and serve.

Enjoy!
Tea and brownies!

Thursday, February 3, 2011

Pudding Success!

Ahhhhhhh...

Well, folks, I am glad I made pudding tonight. Pudding, to me, is the ultimate comfort food. No food is more soothing to my soul than good ole chocolate pudding. And that is precisely what I needed tonight. You see, after I made my pudding, my dad called me to let me know that he and my mom had our family cat, Spooky, put down tonight. She was 15 years old and lived a good life and was apparently having kidney failure. She was a good cat- just aloof enough, yet also came around for attention from time to time. She used to be good friends with my dog Ducky, but he was put down a year and a half ago.

So there you have it. I guess you can see that I'm an animal person. Luckily my papillon, Lucy, knows just how to cheer me up. She hates seeing me sad and always stays right by my side. But aside from Lucy, pudding makes for a good consolation.

It's funny because I was already needing the comfort of pudding because it is the dead of winter and I tend to get SAD. This year has been the worst, probably because I'm not running this winter (damn you, stupid knee!). Dancing helps cheer me up for the most part, but dancing also happens to be both the best and the worst thing for my self esteem...


But anyway, back to this fabulous pudding win. After last week's failure, I decided to go for a pudding recipe that called for egg yolks and cooking the custard over direct heat. This pudding came together so quickly, it was finished before my potato (which was cooking, hasselback-style, in the oven). Last week's pudding had me standing over the stove for nearly an hour with no thick result. This week, the pudding turned thick quite quickly!


Gloppy

And now that I've had a bowl, I can say it was quite delicious and was just what I needed. It was thick, it was chocolatey, and I could taste the butter in it. It's a good thing I live by myself, because that means I don't have to share the rest of it with anyone. Mwahahahahaha!

For the recipe, go to this link.

Sunday, January 30, 2011

Pudding Fail

Pretty!
So lately I have been craving chocolate pudding.It's soft, smooth texture is very comforting and during the winter months, comfort is what I need. I also had a surplus of whole milk that needed used, so that factored into my desire to make pudding.

To find a recipe, I headed to one of my favorite websites, foodgawker. As I perused the recipes, I found that I had two options: make a pudding with cocoa powder or make a pudding with real chocolate. I decided upon real chocolate because I wanted something really chocolatey. I eventually chose this recipe from Smitten Kitchen.

The recipe was only supposed to take 20 minutes at the stove, but I wound up hovering over the stove for about an hour. I'm not entirely sure what went wrong, but the recipe asks you to cook the custard in a double boiler, and I think the indirect heat was the problem. After nearly an hour, my pudding never thickened and was just a custard, maybe a little thicker than creme anglaise.

Yummmm...
It wasn't until I was asleep that night that I realized one thing I had done wrong with the recipe: I had added 5 ounces of chocolate instead of 6. Oops. The custard was still chocolatey and delicious, just not the texture I was looking for.

I served the "pudding" on Friday when I had Frakah over for dinner. I served it in nice little bowls with some whipped cream spiked with scotch whiskey. I discovered that the scotch paired nicely with the pudding as I was making the pudding because I sipped some scotch as I tasted the custard. I have to say, it was still tasty and chocolatey, but I am determined to try a different recipe, perhaps one that calls for eggs.

Sunday, January 16, 2011

Early Morning Brownies

Brownies!
Well, folks, it’s 2011 and the times they are a-changin.’ I’ve always had this feeling that some major changes would come when I turned 28. Now that I’m here, I have this strong feeling that that prediction was not far off mark. According to astrology, major life changes occur every 27-30 years- it’s something to do with Saturn shifting houses (I think- please don’t quote me). And changes are happening indeed.


Specifically, I have moved into my own apartment and am living alone for the first time in my life. I admit, it’s a little scary at the moment. I’m not used to all this time to myself and I fear my dog, Lucy, thinks I’m going out of my mind, what with all the talking to myself and referring to myself as a “we.” I even adopted a kitten from the humane society yesterday as a companion for both my dog and me. Because, as introverted and secluded as I can be, I am simply used to being around people.

But it’s not all bad. I can sing or dance whenever I feel like it, without judgment (other than from Lucy). I can eat dinner as early or late as I like (okay, so I usually do that anyway), and I can stay up as late or go to bed as early as I desire.

All this change, however, has left me feeling a bit uneasy as I make the transition. I’ve never been good with transitions; in fact, I hate them. My ideal world is a place where there is never that feeling of being in the middle- you are always at your destination. My ideal world has a teleportation device that takes you from here to Australia in nanoseconds. But alas, this is not my ideal world. So my poor tummy has been angrily grumbling at me, alternately growling for more food and lambasting me for filling it. This, in turn, has led to a reduced ability to get a full night’s sleep. Which leads me to the early morning brownies.

It all began just prior to 4am on Thursday morning when Lucy awoke me with little whines and urgent kisses on my nose. She had to go potty. So I got out of bed, pulled on my boots and a coat and took Lucy out to the grass. She was quick to do her business and we promptly returned to our little abode. I took off my coat and boots and got back into bed. But I could not fall asleep. So just before 5am, I got back out of bed with the inspiration to rearrange my closet. Then I realized I was starving and fixed myself some toast with Nutella. Then I saw my Ready for Dessert cookbook by David Liebovitz that I had gotten for Christmas. I decided to have a look-through and came across a brownie recipe. When I realized I had everything on hand to make these brownies, and that I also had the time to bake them before I had to get ready for work, I decided to go ahead and bake some brownies at 5am. What the hell, right?

Baking brownies early in the morning is kind of nice. Probably more peaceful for me than baking in the afternoon. I put on some Queen and chopped some chocolate. Too little chocolate. But it was all good, because I just chopped more when I realized my mistake! The recipe called for 8 ounces of either bittersweet or semisweet chocolate, so my non-committal self chose both! Why not?! The recipe also called for preparing the batter entirely in the saucepan, which I have never done before. When the batter was finished, I slid them into the oven and proceeded to clean my kitchen. I even ran a load of laundry and dishes. I was on a roll! Once the brownies were out of the oven, I got ready for work and had a second breakfast. And then I left, without the brownies.

Let me just say that it is really difficult for me to last an entire work day knowing that I have brownies waiting for me at home. Brownies which I have never tasted before. You see, brownies are my favorite. I can’t say exactly what favorite they are, I just simply love them. I believe brownies are in a class all their own. They’re not cake, they’re not cookie, and cannot even be compared to custardy desserts (Tiramisu being my favorite there). So anyway, by the time I got home I was tempted to skip dinner and go straight for the brownies (which may or may not have been what I actually did- I honestly cannot remember, as I was in such a brownie-daze). All I can say is that with the first bite, I experienced extreme pleasure, and then minor disappointment. You see, these were not the best brownies I have ever had. That title remains with my New Best Recipe version of the brownie. I can’t quite put my finger on it- maybe these are too sweet, not buttery enough, and not quite substantive enough… But they’re good and they’re satisfying. And they’ve made up about half of my meals since making them…

Brownies in the pan
Well, I suppose I’ll quit torturing you with my blathering and give you the recipe.

Robert’s Absolute Best Brownies
from Ready for Dessert by David Liebovitz

6 tbsp unsalted butter, cut into pieces
8 oz bittersweet or semisweet chocolate, chopped
¾ cup sugar
1 tsp vanilla extract
2 lg eggs, at room temp
1/4 cup all-purpose flour

     Preheat the oven to 350 degrees F. Line the inside of a 9-inch square pan with 2 lengths of foil, positioning the sheets perpendicular to each other and allowing the excess to extend beyond the edges of the pan. Lightly grease the foil with butter or non-stick cooking spray.
     In a medium saucepan, melt the butter, then add the chocolate and stir over low heat until the chocolate is melted and smooth. Remove from the heat and stir in the sugar and vanilla until combined. Beat in the eggs one at a time. Add the flour and stir energetically for 1 full minute, until the batter loses its graininess, becomes smooth and glossy, and pulls away a bit from the sides of the saucepan.
     Scrape the batter into the prepared pan and bake until the center feels almost set, about 30 minutes. Don’t overbake.
     Let cool completely before lifting out the foil to remove the brownies.

Sweet goodness
Enjoy!

Monday, December 13, 2010

Baking Compulsion, Part 2 wherein I bake cookies, crackers, rolls and truffles

Super Duper Chocolate Mint Cookies
So my baking compulsion is getting a little out of control. Not only do I feel the need to keep my hands busy with baking, but I feel the need to be perfect at it. I want to make the best cookies, the best cakes, the best everything, really, and it's just too much. This weekend the stress got to me. Granted, my perfectionism isn't limited to baking. I'm also a perfectionist with my schoolwork (I'm allergic to anything that is not an A) and really any work that is examined or seen by another person. This might make me a type A personality, but it also means I'm a good baker. I'm lucky in that respect.

Dinner Rolls


This weekend my baking compulsion kicked into high gear and I produced cheese crackers, super super chocolate mint cookies, two kinds of truffles, and homemade dinner rolls. And it all turned out fantastically. I consider myself lucky. I won't get into the nitty gritty of my baking this time, except to say there was some watching of Prancer and Meet Me in St. Louis (both great movies). For my cookies, I had been dreaming of turning my famous Super Duper Chocolate Cookies into mint chocolate cookies, and that dream came true in what I believe to be the perfect cookie. To make the mint cookies, all I did was decrease the amount of coffee powder to 1 tsp and decrease the vanilla to 1 tsp and add 1 tsp peppermint extract. Then, instead of white chocolate chips, I added a cup of mint M & M's. 


For the rolls recipe, I used the one found here.


Peppermint Truffles


Truffles

Ingredients (yields ~ 18 truffles)

Chopped hazelnuts or
Cocoa powder, sifted or
Crushed candy canes
3-1/2 ounces bittersweet chocolate
3-1/2 ounces semisweet chocolate
½ cup heavy cream
1 tbsp Frangelico or Peppermint Schnapps
1 tbsp hot coffee
1/2 tsp vanilla extract

Directions

1. Chop the chocolate and place in a bowl.

2. Heat cream over medium-high heat until it reaches a boil. Immediately pour hot cream over bowl with chocolate and whisk until smooth.

3. Whisk in liqueur, coffee, and vanilla.

4. Cover mixture and transfer to refrigerator for about an hour.

5. Using a small ice cream scoop, make scoops of chocolate mixture and place on a lined cookie sheet. Transfer back to fridge for another 15-20 minutes.

6. Remove truffles from fridge only 4 at a time to prevent unnecessary melting. Roll dollops into balls with your hands (remember, doesn’t have to be perfect) and roll in either the hazelnuts, cocoa powder, or candy canes.

7. Package as you wish and store in the fridge until ready to serve.


Cheese Crackers
Oat-and-Cheddar Crackers
from December 2010 Food & Wine

1/2 cup old-fashioned rolled oats
1/4 cup milk
3/4 cup all-purpose flour
1/4 tsp baking powder
1/4 tsp salt
4 oz sharp cheddar cheese, shredded
2 tbsp cold unsalted butter, cut into small pieces
1 lrg egg, lightly beaten
Egg wash: 1 lrg egg yolk lightly beaten with 1 tbsp milk
Demerara or Turbinado sugar

1. In a small bowl, combine the oats and milk and let stand until the oats soften slightly, about 5 minutes.

2. In a food processor, combine the flour, baking powder and salt and pulse a few times to blend. Add the cheese and butter and pulse until a coarse meal forms. Stir the beaten egg into the softened oats, then scrape the oats into the food processor. Pulse until a dough forms. Scrape the dough onto a large sheet of plastic wrap and gently knead a few times until thoroughly blended. Pat the dough into a disk, wrap it up and refrigerate until firm, about 1 hour.

3. Preheat the oven to 375 degrees F. Line 2 baking sheets with parchment paper. Work with half of the dough at a time: on a lightly floured work service, dust the dough with flour. Cover with a large sheet of plastic wrap. Roll out the dough 1/8 inch thick. Quickly cut the dough into 1 1/2 inch squares or stamp out different shapes. Brush off any excess flour and transfer the squares to one of the baking sheets. Refrigerate for at least 5 minutes, until the squares are firm. Repeat with the second piece of dough.

4. Lightly brush the squares with the egg wash and lightly sprinkle with sugar. Bake for about 16 minutes, until the crackers are golden brown. Transfer to a rack and let cool before serving or packaging.

Sunday, November 28, 2010

Christmas Baking Extravaganza, Part I

A Delicious Pair
 Over the course of the next few weeks, I intend to do lots of baking. I want to bake cookies and brownies and crackers and truffles and barks and toffees and and and... You get the picture. So my sister and I got an early start on our baking this weekend. Hey, if the tree is already up in the living room , I think it's perfectly acceptable to start Christmas baking.

So Frakah and I put in a steady stream of Christmas movies (The Leprechaun's Christmas Gold, anyone?), and baked some Chocolate Mexican Wedding Cookies and Orange Nutmeg Cookies. We started on the Chocolate Mexican Wedding Cookies first since they needed to chill the longest in the fridge. The recipe comes out of an awesome Ghirardelli Chocolate cookbook I picked up in Monterrey last year when I visited one of my best friends. The recipe was actually pretty easy to prepare. The hardest part was lugging out my mom's super-heavy food processor to grind the pecans. Frakah took over the creaming process while I handled the dry ingredients and the dough came together in no time. While the dough chilled in the fridge, we prepared the dough for the Orange Nutmeg Cookies. I had the luxurious duty of grating orange zest and nutmeg. Needless to say, my hands smelled nice afterward. Again, Frakah took over the wet ingredients while I measured the dry. Once the dough came together, it too went into the fridge. We had a half hour to relax before it was time to roll the Orange Nutmeg dough into logs.

Pre-Powder
After chilling, the Mexican cookie dough was ready to be rolled into balls and baked. The dough was very tender and crumbly after coming out of the oven, so I'm sad to say there were a few casualties when I transferred the cookies to wire racks. While warm, we rolled the cookies in a mixture of powdered sugar and cocoa. There was another casualty or two, but it was a tasty casualty.

The Orange Nutmeg Cookies, after chilling, were covered in egg wash and rolled in turbinado sugar. They looked so blingy and fancy before going into the oven. Frakah and I dreamed of fancy cocktail parties with these fabulous-looking cookies. They even looked and smelled delicious fresh out of the oven.

To celebrate our first baking success of the season, Frakah and I enjoyed some homemade eggnog lattes. I brewed some espresso in my stove top Italian coffee maker while Frakah whipped up the special stuff. We tinkered the recipe a bit to make it more eggnogy (what is eggnog without nutmeg and booze?). I suppose I should delay the recipe no further so that you, too, can enjoy the fruits of our success.

Chocolate Mexican Wedding Cookies
from The Ghirardelli Chocolate Cookbook

1 cup unsalted butter, at room temp.
1/3 cup powdered sugar
2 tsp pure vanilla extract
1 3/4 cups all-purpose flour
1 cup ground pecans
1/2 cup Ghirardelli Sweet Ground Chocolate and Cocoa
3/4 tsp ground cinnamon
Pinch of salt

1/2 cup powdered sugar
1/4 cup Ghirardelli Sweet Ground Chocolate and Cocoa

To make the cookies, in a large bowl, cream the butter and powdered sugar with an electric mixer until light and fluffy. Add the vanilla.

In a separate bowl, stir together the flour, pecans, ground chocolate, cinnamon, and salt. Gradually add the dry ingredients to the creamed mixture and mix until well blended.

Powdered
Wrap the dough with plastic wrap and chill for 1 to 2 hours, until firm.

Preheat the oven to 325 degrees F.

Shape the dough into 1-inch balls. Place the balls 1 inch apart on an ungreased baking sheet. Bake for 15 to 18 minutes, until the cookies are firm to the touch. Cool for 1 minute on the cookie sheet, and then transfer to a wire rack.

To make coating, sift powdered sugar and ground chocolate into a shallow bowl. While the cookies are still warm, roll them in the coating.

Note: Our cookies took less time in the oven. We produced about 44 1-inch balls.

Orange Nutmeg Cookies
from The Grand Central Baking Book

2 cups all-purpose flour
1/2 tsp salt
1 1/2 tsp freshly grated nutmeg
1 cup unsalted butter, at room temp.
3/4 cup granulated sugar
1 egg, at room temp.
2 tbsp finely chopped orange zest
Egg wash (mix an egg, 1 tbsp water, and pinch of salt)
Turbinado sugar, for rolling

Measure the flour, salt, and nutmeg into a bowl and whisk to combine.

Using a stand mixer with the paddle attachment, beat the butter and granulated sugar together on medium speed until very smooth and fluffy, about 5 minutes.

Add the egg and orange zest and reduce the mixer speed to low.

Add the dry ingredients and mix just until they disappear into the dough. Chill the dough for approximately 30 minutes so it will be easier to handle.

Shape the dough into 2 logs 2 inches in diameter, then chill for at least 2 hours and up to 3 days. I used wax paper the shape and cover the logs.

Preheat the oven to 350 degrees F. Line 2 baking sheets with parchment paper. Lightly brush each log of dough with the egg wash, then roll in the turbinado sugar, using some pressure so that the sugar adheres to it. Slice the cookies 1/4 to 1/2 inch thick and place them about 1 inch apart on the prepared pans. Bake for 20 minutes, rotating pans halfway through the baking time. The cookies are ready when the edges have browned slightly and the centers are light golden brown.

Note: Our cookies took significantly less time in the oven. We also learned thicker is better. We made maybe 3 1/2 dozen cookies. Maybe.

Eggnog-Flavored Latte
adapted from Coffee by Avner Laskin

2 egg yolks
3 tbsp sugar
1/2 cup heavy cream
2 tbsp rum
2 cups milk
4 servings espresso, short
freshly grated nutmeg, to taste

1. Place the egg yolks and sugar in an electric mixer and blend until smooth and bright yellow.

2. Whip the cream and rum until it forms stiff peaks and fold into the egg yolk mixture.

3. Heat the milk in the microwave until it is just below boiling. Fill each mug halfway with hot milk.

4. Prepare espresso and pour 1 serving in each cup.

5. Top each glass with 3 or 4 teaspoons of the egg and cream mixture. Grate nutmeg on top and serve.

Note: This makes four servings, We cut it in half and made 2 and still had cream left over.

Enjoy!

Eggnog and Cookies!