Pages

Sunday, May 8, 2011

Something Special

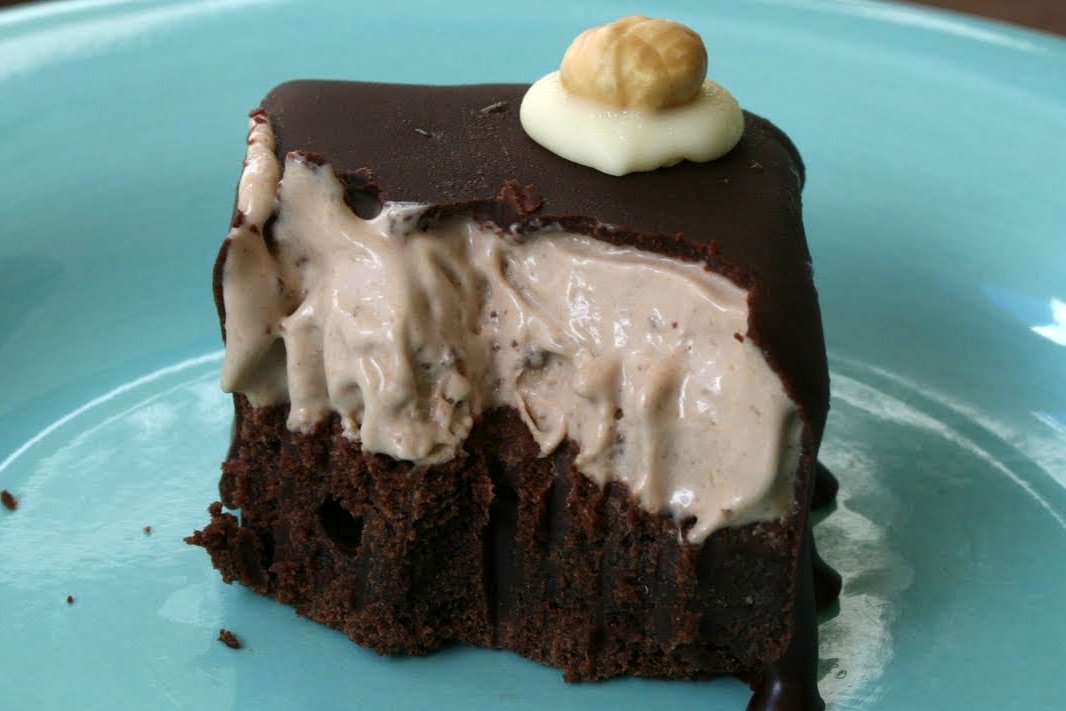
Oh so pretty and fancy-looking.
By now you should know that I've been on an ice cream kick lately. Making ice cream is a lot of fun and very rewarding. I knew I wanted to make another ice cream, but I wanted to take it one step further and make something really special.

Every now and then, I like to make something special just because. Mostly because it makes me feel good. It makes me feel especially good to come up with an idea and make it into reality. But I also like to treat myself. Hey, I'm a single girl, so I'm aloud to make myself feel special once in awhile. Though, I must say, my nephew made me feel pretty special today. He gave me a card for mother's day because even though I'm not a mother, I'm a pretty cool aunt. But also, he gave me a hug and kiss goodbye because he wanted to make me happy.

So, for my special treat, I knew I wanted to make a chocolate hazelnut ice cream. In addition, I wanted to involve a brownie. I also thought about chocolate-dipped ice cream, so I came up with an idea for a brownie base with hazelnut ice cream on top, enrobed in bittersweet chocolate, and topped with a little white chocolate and a roasted hazelnut.

The execution of this dessert was somewhat tricky. Next time, I will use a softer chocolate cake recipe, as the frozen brownie is a bit hard to get through (though mighty tasty). The hazelnut ice cream is incredibly addictive. Seriously. I could just sit there and eat all of it in one sitting. But my willpower is much stronger than that, thankfully.

So, without further ado, here is my recipe for a very lovely dessert. This is one I'll keep in my back pocket for the future, when I want to make something extra special for someone.

A little frostbitten, but still pretty.
Gianduja Gelato
from The Perfect Scoop

1 1/2 cups hazelnuts, toasted
1 cup whole milk
2 cups heavy cream
3/4 cup sugar
1/4 tsp coarse salt
4 oz milk chocolate, finely chopped
5 lrg egg yolks
1/8 tsp vanilla extract

Roast the hazelnuts in the oven at 350 degrees F for about 10 minutes, stirring once or twice. Remove the hazelnuts from the oven and rub them in a kitchen towel to remove as much of the skins as possible, then finely chop them in a food processor.

Warm the milk with 1 cup of the cream, sugar, and salt in a saucepan. Once warm, remove from the heat and add the chopped hazelnuts. Cover and let steep at room temperature for 1 hour.

Put the milk chocolate pieces in a large bowl. Heat the remaining 1 cup cream in a medium saucepan until it just begins to boil. Pour it over the milk chocolate pieces and stir until the chocolate is completely melted and smooth. Set a mesh strainer over top.

Pour the hazelnut-infused milk through a strainer into a medium saucepan, squeezing the nuts firmly with your hands to extract as much of the flavorful liquid as possible. Discard the hazelnuts.

Rewarm the hazelnut-infused mixture. In a separate medium bowl, whisk together the egg yolks. Slowly pour the warm hazelnut mixture into the egg yolks, whisking constantly, then scrape the warmed egg yolks back into the saucepan.

Stir the mixture constantly over medium heat with a heatproof spatula, scraping the bottom as you stir, until the mixture thickens and coats the spatula. Pour the custard through the strainer and stir it into the milk chocolate mixture. Add the vanilla and let cool.

Chill the mixture thoroughly in the refrigerator, then freeze it in your ice cream maker according to the manufacturer's instructions.

Chewy-Dense Brownies
from The Perfect Scoop

1/2 cup unsalted butter, cut into pieces
4 oz unsweetened chocolate, cut into small pieces
1 1/4 cups sugar
2 lrg eggs
1 tsp vanilla extract
1/2 cup flour
1/8 tsp salt

Preheat the oven to 350 degrees F.

Line an 8-inch square pan with a long sheet of aluminum foil that covers the bottom and reaches up the sides. Grease the bottom and sides of the foil with nonstick cooking spray.

Melt the butter in a medium saucepan. Add the chocolate pieces and stir constantly with a whisk over very low heat until the chocolate is melted.

Remove from the heat and stir in the sugar, then the eggs one at a time, and the vanilla. Stir in the flour and the salt. Beat the batter vigorously for 30 seconds, until it begins to form a smooth ball.

Scrape the batter into the prepared pan, smooth the top, and bake for 30 minutes, until the center feels just about set. Remove from the oven and let cool.

Chocolate Coating
adapted from the Tartufi recipe in The Perfect Scoop

8 oz bittersweet chocolate, chopped
8 tbsp unsalted butter, cut into pieces
2 tbsp corn syrup

Melt the chocolate, butter, and corn syrup in a medium bowl placed over a pan of simmering water, stirring constantly.
Enjoy!
To assemble my dessert:
1. Spread the freshly-churned ice cream over top of the brownies in the pan. You will not use all of the ice cream. Place in the freezer until firm.
2. Cut the brownie/ice cream combo into 16 pieces. This will be difficult as the brownies will be hard. Place these pieces on a line baking sheet, then place in the freezer until firm.
3. Dip the brownie pieces into the chocolate coating, then place back on the baking sheet and stick it back in the freezer until set.
4. Melt a little bit of white chocolate in the microwave, then spoon little dollops on top of the brownie pieces, placing a peeled roasted hazelnut on top. This makes it look fancy.

Note: This was a very messy and time-consuming process, but the end result was worth it. At one point, I though the brownies were to hard and it would not turn out, but I think they're at least beautiful. Plus, if you let the desserts thaw a little, the brownies part isn't so hard.

Monday, May 2, 2011

Double Chocolate Ice Cream for My Mom's Birthday

Chocolate Yumminess
This weekend we celebrated my mom's birthday, and she requested that I make her ice cream. She really didn't have to twist my arm on this one. I've been on an ice cream kick lately, and was excited to try out a different chocolate ice cream recipe.


Gloppy

Before I delve into the ice cream, however, let me take a minute to talk about my mom. I never give her enough credit, but she is a good mom. Whenever I'm sick, she's there, either making me toast or bringing me Jamba Juice. When I had to have my gallbladder removed, my mom was there at the hospital with me, holding my hand until the doctor wheeled me away. She was also there when it was time to put my old dog Ducky down and I wasn't strong enough to go into the vet's office. But my mom isn't just there when things are down. I have also had some great times with my mom, like riding the Rockin' Roller Coaster at Disney World on Mother''s Day, or travelling Scotland and Ireland together. My mom is also a loyal supporter of my bellydancing, and has sewed two costumes for me. In fact, my mom has sewed many costumes for me since I was a little girl. So, when my mom asked me to make ice cream for her, it was a no-brainer.

Now for the ice cream. It is creamy. It is chocolaty. It is a little bit crunchy. Simply put, it is delicious. It is chocolate stracciatella ice cream. For those of you not in the know, stracciatella is an Italian thing. When you go to my favorite gelato shop in Rome (the one with over 100 flavors), you will see several stracciatellas. Standard stracciatella is sweet cream gelato with ribbons of chocolate in it. I decided to make a bittersweet chocolate ice cream with ribbons of semi-sweet chocolate. My mom loves chocolate ice cream, so I figured this would be perfect. And it was.


Churning...
 Chocolate Ice Cream
from The Perfect Scoop

2 cups heavy cream
3 tbsp unsweetened Dutch-process cocoa powder
5 oz bittersweet chocolate, chopped
1 cup whole milk
3/4 cup sugar
Pinch of salt
5 lrg egg yolks
1/2 tsp vanilla extract

Warm 1 cup of the cream with the cocoa powder in a medium saucepan, whisking to thoroughly blend the cocoa. Bring to a boil, then reduce the heat and simmer at a very low boil for 30 seconds, whisking constantly. Remove from the heat and add the chopped chocolate, stirring until smooth. Then stir in the remaining cream. Pour the mixture into a large bowl, scraping the saucepan as thoroughly as possible, setting a mesh strainer on top of the bowl.

Warm the milk, sugar, and salt in the same saucepan. In a separate medium bowl, whisk together the egg yolks. Slowly pour the warm milk into the egg yolks, whisking constantly, then scrape the warmed egg yolks back into the saucepan.

Stir the mixture constantly over medium heat with a heatproof spatula, scraping the bottom as you stir, until the mixture thickens and coats the spatula. Pour the custard through the strainer and stir it into the chocolate mixture until smooth, then stir in the vanilla.

Chill the mixture thoroughly in the refrigerator, then freeze it in your ice cream maker according to the manufacturer's instructions.

Enjoy!
Stracciatella
from same book as above

5 oz semisweet chocolate, chopped

Melt the chocolate in a liquid measuring cup by zapping it in the microwave at 30-second intervals. I think mine took about 1 minute total. At the very last second of churning the ice cream, drizzle in the melted chocolate in thin streams, making sure not to get chocolate on the dasher. You can also spoon some into the ice cream as you layer it in a plastic container, making sure to break up the chunks.

Sunday, May 1, 2011

Easter Tea with Lemon Scones

Lemon Scone!
I'm sure you all know by now how I feel about tea as a meal. I love it. If you don't know, read this post. Well, my friends, I'm not the only one who likes tea. My family likes it too. Which is why we decided to do tea for Easter, in lieu of our usual brunch or dinner.

I knew as soon as we decided to have tea that I wanted to make scones, for what is a tea without scones? Nada, that's what. I decided to make the Sour Lemon Scones from my Baked cookbook, because lemon sounded nice and Spring-y. Besides, yellow is one of the wonderful colors I associate with Easter.


I also made these lovely sandwiches.
You might not know it, but I actually really love Easter. I mostly love the colors, but I also love the candy. And the Easter Bunny. And, most of all, the memories of dressing in matching dresses that my mom made for my sister and I and going to church wearing our Sunday finest.

As for the scones, they were well received by all. I actually served them at two teas in one weekend (yes, I was so lucky!). At both teas, they were a hit. They were tender and flaky, best served fresh out of the oven, no accompaniment needed. They were just lemony enough, though I'm not sure why they are called "sour lemon" scones, as there is nothing sour about these scones. Simply delicious.


Enjoy!
 Sour Lemon Scones
from Baked: New Frontiers in Baking

4 cups all-purpose flour
1/2 cup sugar
1 tbsp baking powder
1/2 tsp baking soda
1/2 tsp kosher salt
1/2 tsp ginger
3 sticks unsalted butter, cubed and cold
1 lrg egg
1 cup buttermilk
1/4 cup grated lemon zest (from about 3 lemons)
2 tbsp raw sugar

Preheat the oven to 350 degrees F. Line a baking sheet with parchment paper.

In a large bowl, combine the flour, sugar, baking powder, baking soda, salt, and ginger. Whisk until combined.

Add the butter. Use your fingertips to rub the butter into the flour until the butter is pea-sized.

In a separate bowl, whisk together the egg, 3/4 cup of the buttermilk, and the lemon zest. Slowly pour the wet ingredients into the dry ingredients, and then gently knead the dough with your hands until the dough starts to come together. Move the dough to a lightly floured surface. Use your hands to shape the dough into two discs (about 1 1/2 inches in height). Do not overwork the dough.

Cut each disk into 6 wedges. Place the wedges onto the prepared baking sheet. Brush each scone with the remaining buttermilk and sprinkle with raw sugar. Bake in the center of the oven for about 25 to 30 minutes (rotating the baking sheet halfway through the baking time) or until the scones are golden brown.

Transfer the scones to a cooling rack; they can be served slightly warm or completely cooled.

Note: Since I served these twice, on day one I put one of the discs, wrapped in plastic wrap, in the fridge until the next day when I was ready to bake and serve them.

Saturday, April 23, 2011

My Signature Ice Cream, and some other musings...

Sundae for a sunny day.
Only connect! That was the whole of her sermon.
Only connect the prose and the passion, and both will be exalted,
And human love will be seen at its height.
Live in fragments no longer.
Only connect...


from Howard's End by E.M. Forster

I read Howard's End a few years ago, and this was my favorite quote that has stuck with me ever since. I believe that connection is the essence of what we are searching for in this crazy thing called human life. When we interact with people, animals, objects, and technology, we can either choose to connect or not. In order to connect, your mind must be fully present. Distraction is one of the many things causing fragmentation in our lives. When you are talking to a person, perhaps someone you really care about, but you are also checking your iPhone, you are not truly connecting to either thing, for your concentration is fragmented. Only connect!

What does this have to do with food? Well, for starters, I am blogging about my food, which is a means of connecting with people who are not physically present to experience the food. By putting my words and my food (and, thereby, some might say my love) into cyberspace, I create an opportunity for others to share and connect. Ideally, however, food is a way for me to connect with people in the "real" world. Nothing is more satisfying to me than sharing something that I have made with my own two hands (and possibly my blood, sweat and tears) with people I care about. When someone takes a bite of one of my chocolate chip cookies and tells me how amazing it is, I'm on cloud 9. I'm happy because something that I made has brought happiness to someone else, even if momentarily. To me, this is true connection.

Churning the goodness.
And thus, I will share with you one of my favorite creations so far. Vanilla ice cream with a peanut butter-honey swirl. I hatched the idea earlier this week when I was munching on my snack of peanut butter and local raw wildflower honey on saltines. It may sound like a boring snack, but I was seriously loving it (it was all about the honey, which might be the best ever). After making ice cream last week, I felt inspired to make more, and so I thought about an ice cream with a peanut butter-honey swirl. I went to my The Perfect Scoop book for the vanilla ice cream recipe, and looked online for a peanut butter swirl recipe, but what I did not find anything. I found a recipe for a peanut butter maple almond swirl, so I used the basic measurements from that to do it my way.

The end result is fantastic. I knew the ice cream would be creamy because the custard base was nice and thick. When I was in college, I developed a terrible habit of eating vanilla ice cream with a spoonful of peanut butter that I would stir in by hand. Thanks to my handy-dandy ice cream maker, that will no longer be necessary, for I have created an ice cream based on that old, cherished ritual. The smooth vanilla ice cream and the creamy peanut butter swirl taste absolutely wonderful together. This, my friends, is going down as my signature ice cream.

So yummy.
Vanilla Ice Cream
minorly adapted from The Perfect Scoop

1 cup whole milk
3/4 cup sugar
2 cups heavy cream
Pinch of salt
1 vanilla bean, split in half lengthwise
6 lrg egg yolks

Warm the milk, sugar, 1 cup of the cream, and salt in a medium saucepan. Scrape the seeds from the vanilla bean into the warm milk and add the bean as well. Cover, remove from the heat, and let steep at room temperature for 30 minutes.

Pour the remaining 1 cup cream into a large bowl and set a mesh strainer on top. In a separate medium bowl, whisk together the egg yolks. Slowly pour the warm mixture into the egg yolks, whisking constantly, then scrape the warmed egg yolks back into the saucepan.

Stir the mixture constantly over medium heat with a heatproof spatula, scraping the bottom as you stir, until the mixture thickens and coats the spatula. Pour the custard through the strainer and stir it into the cream. Put the vanilla bean into the custard, and let cool.

Chill the mixture thoroughly in the refrigerator. When ready to churn, remove the vanilla bean, rinsing and reserving it for another use, and then freeze the mixture in your ice cream maker according to the manufacturer's instructions.

Note: I omitted the originally called-for 3/4 teaspoon of vanilla extract, because I did not want an overpowering vanilla flavor that would compete with the peanut butter swirl.

Enjoy!
Peanut Butter-Honey Swirl

1/2 cup smooth peanut butter
1 1/2 tbsp good quality honey
2 tbsp vegetable oil

Stir together the ingredients until smooth and of uniform consistency. Drizzle into the ice cream just before the end of the churning process. Churn until just swirly, not overly mixed.

Friday, April 22, 2011

You Can Call Me Ice Cream Girl


A lovely sundae.
 Why yes, that is what you can call me, for I have made a most delectable ice cream. You see, my sister, Frakah, had planned to have an ice cream social at her place this past weekend. There would be ice cream, toppings, add-ins, what have you. At the inception of her plan, I knew that I must make some ice cream for the party. I've made ice cream several times before- I believe I have a pretty good recipe for vanilla, and I make a chocolate truffle ice cream that is to die for. But I wanted to do something new.

So I bought a book. I really must stop acquiring cookbooks, but they're just so wonderful and full of new, exciting recipes. The book in question is The Perfect Scoop by David Lebovitz. When I received the book in the mail, I excitedly flipped through, checking out all of the wonderful recipes I could make. There are recipes for ice creams, gelatos, sorbets, sherbets, toppings, add-ins, and vessels. It is nothing short of awesome.

When it came time to actually pick a recipe, I looked at the ingredients I already had (whole milk and eggs), and the preparation required. I decided on coffee ice cream because a) I love coffee ice cream, and b) the recipe looked easy to pull together. Boy, am I happy with that decision. Not only was this ice cream easy to make, but the result was phenomenal. So phenomenal, I was sad after I finished the last bite (but not too sad, because of all the caffeine).

I also decided upon coffee ice cream because it would go well with toppings (i.e. chocolate). For this purpose, I looked to the back of the book and happened upon a recipe for chocolate marshmallow topping. Lord Almighty, was this good. Again, it was an easy recipe with ingredients that I mostly had on hand (Frakah supplied the marshmallows).

The ice cream social itself didn't really happen as planned. It turned out to just be me, Frakah, our friend, and our friend's fiance. But a good time was had by all! Three of us enjoyed sundaes (yes, coffee ice cream and chocolate marshmallow sauce taste fantastic together), and our friend worked on a beer float/milkshake. We played Cranium (Frakah and I won!) and Imaginiff (the only guy there won!) and then we watched one of the strangest movies I've seen in awhile.


Churn, baby, churn!

Coffee Ice Cream
from The Perfect Scoop by David Lebovitz

1 1/2 cups whole milk
3/4 cup sugar
1 1/2 cups whole coffee beans
pinch of salt
1 1/2 cups heavy cream
5 large egg yolks
1/4 tsp vanilla extract
1/4 tsp finely ground coffee

Warm the milk, sugar, whole coffee beans, salt, and 1/2 cup of the cream in a medium saucepan. Once the mixture is warm, cover, remove from the heat, and let steep at room temperature for 1 hour.

Rewarm the coffee-infused milk mixture. Pour in the remaining 1 cup cream into a large bowl and set a mesh strainer on top. In a separate bowl, whisk together the egg yolks. Slowly pour the warm coffee mixture into the egg yolks, whisking constantly, then scrape the warmed egg yolks back into the saucepan.

Stir the mixture constantly over medium heat with a heatproof spatula, scraping the bottom as you stir, until the mixture thickens and coats the spatula. Pour the custard through the strainer and stir it into the cream. Press on the coffee beans in the strainer to extract as much of the coffee flavor as possible, then discard the beans. Mix in the vanilla and the finely ground coffee and let cool.

Chill the mixture thoroughly in the refrigerator, then freeze it in your ice cream maker according to the manufacturer's instructions.


Enjoy!

Marshmallow Hot Fudge Sauce
from the same source as above

2/3 cup whole milk
2 tbsp salted butter
185 grams marshmallows
8 oz bittersweet chocolate
1/4 tsp vanilla extract

Warm the milk and butter in a medium saucepan. Add the marshmallows and cook over low heat, stirring constantly, until they've melted. Remove from the heat and add the chocolate pieces. Let stand for 30 seconds, then stir until smooth. Add the vanilla. Serve warm.

Sunday, April 17, 2011

Nonfat Gingersnaps, or, A Guilt-Free Snack for a Guilty Girl

Sweet spicy goodness...
Okay, so I'm not that guilty, but I feel like I am. I eat too many cookies. I love the taste, the texture, and the portability of cookies. There is nothing wrong with this, per se, but every now and then I feel like I'm eating a few more cookies than usual and my pants seem slightly tighter...

And that's when I feel the need to be a little bit healthier. I will eat more salads, more fruit, not drink wine or beer for a little while. And I look for something healthier to bake. This time, I knew exactly what I wanted to make. I had seen this recipe in my Ready for Dessert cookbook that I had received for Christmas- a recipe for a nonfat cookie. There is no butter in this cookie! Note that no butter means that the raw dough does not taste so great...

But the end result was delicious. Very satisfying. I can tell there's no butter in it, but come on, I little miss sensitive over here. I'm one of those people with a genetic predisposition to hating cilantro. But the lack of butter in these cookies is minor, especially given the big spicy flavor. Oh yeah, these cookies pack a punch. With the cinnamon, ground ginger, cloves, black pepper (yeah!), and crystallized ginger, these cookies have a very warm, spicy taste that linger in the mouth...in a good way!

Enjoy!
Nonfat Gingersnaps
from Ready for Dessert

315 g all-purpose flour
1 tsp baking soda
1/4 tsp salt
2 1/2 tsp plus a big pinch ground cinnamon
1 1/2 tsp ground ginger
1/4 tsp ground cloves
1/2 tsp freshly ground black pepper
215 g dark brown sugar
75 g unsweetened applesauce
1/3 cup mild molasses
2 lrg egg whites, at room temp
50 g chopped candied ginger
1/2 cup granulated sugar

Into a medium bowl, sift together the flour, baking soda, salt, 2 1/2 teaspoons cinnamon, the ginger, cloves, and pepper.

In a large bowl, beat together the brown sugar, applesauce and molasses with a hand mixer on medium speed for 5 minutes. Stop the mixer and scrape the bottom and sides of the bowl. Add the egg whites and beat 1 minute. Add the dry ingredients and mix on low speed until completely incorporated, then increase the speed to medium and continue mixing for 1 minute more. Stir in the candied ginger. Cover and refrigerate the dough until firm, at least 1 hour.

Position racks in the upper and lower thirds of the oven; preheat the oven to 350 degrees F. Line 2 baking sheets with parchment paper. In a small bowl, stir together the granulated sugar and big pinch of cinnamon.

Using a small spring-loaded ice cream scoop, drop the heaping tablespoons of dough (about the size of an unshelled walnut) a few at a time into the sugar-cinnamon mixture. Use your hands to form the dough into balls and coat them heavily with the cinnamon sugar. They'll be sticky, which is normal, and don't worry if they're not perfectly round. Place the balls at least 3 inches apart on the prepared baking sheets.

Bake, rotating the baking sheets midway during baking, until the cookies feel just barely set in the centers, about 13 minutes. If they puff up a lot during baking, flatten the tops very gently with a spatula, just enough so they're no longer rounded.

Let the cookies cool on the baking sheets until firm enough to handle, then use a spatula to transfer them to a wire rack.

Monday, April 11, 2011

Rhubarb Crisp

Goes well with vanilla bean gelato.
Ahh, rhubarb. What a funny little vegetable? Fruit? According to wikipedia, rhubarb is usually considered a vegetable, but a New York court decided in 1947 that rhubarb would be considered a fruit for the purpose of regulations and taxes. Who knew that a court could decide how to classify a plant?

The trouble I have with rhubarb is trying to describe its flavor. It is tart and, when cooked, sweet. But that really does not explain what it tastes like. Lemons can be tart and sweet, yet taste nothing like rhubarb. Maybe it tastes pink? Keep in mind that I think bleu cheese tastes like a musty cellar in an old French maison...

Beautiful and red!
Anyway, this weekend I had my sister and her husband, and my brother, his wife, and their son over for dinner. I knew I was going to make quinoa burgers for the main course, but was not sure about dessert until I went to the farmer's market on Saturday morning. When I saw some beautiful rhubarb, I knew I had to make something with it. Then, when I came home from the market, I rummaged through my cookbooks looking for rhubarb recipes. The winner was a rhubarb crisp in my Grand Central Baking book.

This recipe was incredibly easy to pull off. You just chop up the rhubarb, throw it into the bottom of the pie dish, then top it with a simple streusel. Et, voila! Dessert! I paired it with a vanilla gelato that I found on sale at the store. The crisp was a hit, even with my non-rhubarb eating siblings. I must say, the warm crisp with vanilla gelato was simply delicious!

Enjoy!
Rhubarb Crisp from The Grand Central Baking Book

7 oz light brown sugar
5.25 oz granulated sugar
2.75 oz rolled oats
2.5 oz all-purpose flour
3/4 tsp salt
1 stick cold unsalted butter
2 lbs rhubarb stalks

Preheat the oven to 350 degrees F. Butter a 9-inch deep dish pie pan.

Measure the brown sugar, granulated sugar, oats, flour, and salt into a bowl with high sides and stir to combine. Cut the butter into small cubes (1/4 to 1/2 inch) and toss with the cry ingredients. Rub the butter between your thumbs and fingertips, blending everything together until the mixture is mealy, with some big chunks of butter remaining. Chill the streusel in the refrigerator for 10 to 15 minutes before using.

Cut the rhubarb diagonally into 1-inch pieces. Arrange the pieces in an even layer on the bottom of the pan.

Spread the streusel evenly over the top of the rhubarb. Bake for about 1 hour, until the top is dark brown and crispy and the rhubarb is soft and bubbly. Serve warm from the oven.