Pages

Sunday, May 29, 2011

The Ultimate Comfort: Ice Cream and Brownies

Oh, brownies.
More brownies? Yes. Yes, more brownies. I cannot get enough of brownies. Brownies are one treat I tend to have no problem polishing off. That's not to say I don't feel bad about polishing off a pan of brownies, I just accept that guilt is a main ingredient in brownies and figure that the pleasure of brownies far outweighs the guilt. For example, it is now 2:30pm and I have already had two brownies today. I'm feeling only a little bit guilty about that fact. These brownies are so good... I feel like I'm becoming a brownie master.

Look at that gooey caramel.
I don't usually need a reason to bake brownies, but I guess I kind of had a reason to bake them this week. If ever I've got a minor (or even major) case of the blues, brownies are my go-to. When my grandmother died my senior year of college, one of my best friends came over armed with brownie-mix and Hitchcock movies. Though it didn't entirely take the pain of loss away, it helped for a little while. I know that seeking comfort from food is not entirely healthy, but given that I'm healthy overall, I don't see the harm in it. Life is too short to not do things that make you happy. And making (and eating) brownies makes me happy.

Mmm, so good.
As for the ice cream, I had leftover whole milk and cream in my fridge that needed used up before their expiration dates, so I felt like I simply had to make ice cream. I decided that I wanted to do a vanilla base with candy added, and I thought that Butterfingers would be pretty awesome. I was totally right on that point.

I'm not entirely sure why, but I guess I was feeling pretty candy-inspired this week because I also added candy bars to my brownies. For these, I wanted peanut butter and caramel, so I added a broken-up king-size peanut butter bar and a chopped-up Cadbury caramel bar. These additions make for intensely sweet brownies, but served with ice cream and a glass of water, it's overall quite satisfying.

Sweet, heavenly goodness.
Butterfinger Ice Cream
adapted from Vanilla Ice Cream in The Perfect Scoop


1 cup whole milk
3/4 cup sugar
2 cups heavy cream
Pinch of salt
1 tsp vanilla extract
6 lrg egg yolks

2 regular-size Butterfingers

Warm the milk, sugar, 1 cup of the cream, and salt in a medium saucepan.

Pour the remaining 1 cup cream into a large bowl and set a mesh strainer on top. In a separate medium bowl, whisk together the egg yolks. Slowly pour the warm mixture into the egg yolks, whisking constantly, then scrape the warmed egg yolks back into the saucepan.

Stir the mixture constantly over medium heat with a heatproof spatula, scraping the bottom as you stir, until the mixture thickens and coats the spatula. Pour the custard through the strainer and stir it into the cream. Let cool.

Chill the mixture thoroughly in the refrigerator. Freeze the mixture in your ice cream maker according to the manufacturer's instructions. While the ice cream is churning, chop the Butterfingers so that you have small crumbles and some larger chunks (no bigger than hazelnut-size). At the last minute, pour the Butterfinger bits into the ice cream machine as it is churning. Remove the ice cream from the machine and place in a freezer-safe container.


Straight from the pan.
Candy Bar Brownies
adapted from The Perfect Scoop

1/2 cup unsalted butter, cut into pieces
4 oz unsweetened chocolate, cut into small pieces
1 1/4 cups sugar
2 lrg eggs
1 tsp vanilla extract
1/2 cup flour
1/8 tsp salt

2 large candy bars of choice

Preheat the oven to 350 degrees F.

Line an 8-inch square pan with a long sheet of aluminum foil that covers the bottom and reaches up the sides. Grease the bottom and sides of the foil with nonstick cooking spray.

Melt the butter in a medium saucepan. Add the chocolate pieces and stir constantly with a whisk over very low heat until the chocolate is melted.

Remove from the heat and stir in the sugar, then the eggs one at a time, and the vanilla. Stir in the flour and the salt. Beat the batter vigorously for 30 seconds, until it begins to form a smooth ball. 


Cut the candy bars into chunks (about 1-inch squares). Add the candy to the brownie batter and stir until evenly combined.

Scrape the batter into the prepared pan, smooth the top, and bake for 30 minutes, until the center feels just about set. Remove from the oven and let cool.


Enjoy!

Sunday, May 22, 2011

50th Post, A New Name, and a Banana Cake with Mocha Frosting

About as fancy as I can make it look.
Things are looking a little different around here, aren't they? I've been thinking about it for awhile, and I finally decided to make some changes. I knew that "Put Some Honey On Your Cornpone" was to be a temporary blog name for me until I found a name that I thought really represented who I am. I found said name a couple months ago (I think it may have come to me in a dream), but I was waiting for the right moment to make the change. What better time for that than the 50th blog post?

I know, I can't believe it either. I actually stuck with this long enough to have a 50th blog post. I've been known to not finish the things I start (I know- I'm one of those people).

So what's with the new name, you might ask? In case you didn't already know, I am not just an amateur baker. I'm an amateur belly dancer as well. I've been dancing for 3 1/2 years and performing for 1 1/2 years. I love it. And I even love dancing while I'm baking. I do a lot of dancing in the kitchen, really. It's hard to resist the urge to shake my hips when good music is playing. So here I am, combining my two loves: baking and belly dancing.

To celebrate, I decided to make a two-layer cake. I've had some ripe bananas sitting in my freezer for ages, so I thought this would be a good time to make David Lebovitz's Banana Cake with Mocha Frosting (from Ready for Dessert). I made a few little changes, mostly in omitting the nuts. There are supposed to be pecans or walnuts in the cake, but anyone who knows me well knows that I am morally opposed to nuts in things that should be soft (cakes, brownies, ice cream, etc.). I think if I had a mafia name, it would be something like Ray-Ray No-Nuts. That probably sounds really wrong.

This cake is a rather tasty cake. It has been a very long time since I've had a banana cake, and this one reminds me how delicious they are. Soft, moist, mildly fruity with a hint of cinnamon. I kind of overcooked it, but you only notice it at the edges of the cake. The frosting is a little too rich for my tastes. I much prefer a sweet, more balanced frosting. This one is like a buttery ganache, which, believe it or not, is not my favorite. This cake would pair well with a nice glass of cold milk.

Banana Cake
Enjoy!
adapted from Ready for Dessert


350g all-purpose flour
1 1/2 tsp ground cinnamon
1 1/2 tsp baking powder
3/4 tsp baking soda
1/2 tsp salt
1 cup unsalted butter, at room temp.
300g sugar
1 tsp vanilla extract
1 tbsp instant espresso powder
2 lrg eggs, at room temp
6 tbsp lowfat sour cream
2 cups banana puree (see note)

Preheat oven to 350 degrees F. Butter 2 9-inch round cake pans and line the bottoms with parchment paper.

In a medium bowl, whisk together the dry ingredients (flour through salt).

In a large bowl, beat together the butter and sugar using a hand mixer on high speed (unless you have a mega-powered hand mixer, which I do not). Beat until light and fluffy, 3 to 5 minutes. Add the vanilla and espresso powder and beat until combined. Add the eggs one at a time, beating after each addition until combined. Mix in half of the flour mixture, and then add the sour cream and banana puree. Stir in the remaining flour mixture, being careful not to overmix.

Divide the batter evenly between the prepared pans and place in the center rack of the oven. Bake for about 40 minutes, or until a toothpick inserted in the center comes out clean. Remove from the oven and let cool.

Note: For the banana puree, to get 2 cups, I used 4 small overripe bananas, 2 medium fresh bananas, and a few spoonfulls of sour cream (since the bananas provide needed liquid).

Mocha Frosting


10 oz semisweet chocolate, coarsely chopped
1/2 cup strong brewed coffee or espresso
10 tbsp unsalted butter, cut into pieces, at room temp

In a double boiler, melt the chopped chocolate with the coffee, stirring continuously. Once melted, remove the bowl from the heat and add the butter, stirring until thoroughly combined. Place the bowl in the fridge and stir occasionally until the frosting reaches a spreadable consistency.

To assemble the cake:
Place the first layer of cake upside-down on a cake platter.
Spread a layer of frosting over top of the cake.
Place the second layer of cake on top of the frosted layer.
Spoon the remainder of the frosting on top of the cake and spread evenly .

Monday, May 16, 2011

Spinach Artichoke Pasta and My Love of Pedro Almodovar

Pasta and wine- how can you go wrong?
I know, those two topics are entirely unrelated. But I needed an excuse to talk about Pedro Almodovar because I have been watching his films lately, and my list of his movies left to watch on Netflix is dwindling.

I have decided that next to Alfred Hitchcock, Pedro Almodovar is probably my favorite director. His films tend to explore psychological issues with interesting characters. He often features strong female characters with depth, something that can be hard to find in American cinema. If I had to choose a favorite film of his, well, I'd pick three: Broken Embraces, Volver, and All About My Mother. Broken Embraces reminded me of a Hitchcock film and All About My Mother paid homage to great Hollywood actresses. I can't remember much about Volver since I saw it a few years ago, so I guess I'll have to watch it again soon...

I guess I could tie my love of Mr. Almodovar into my post about dinner by saying if I could have dinner with anyone famous, alive or dead, I would choose Mr. Hitchcock and Mr. Almodovar. I think that would make for an interesting evening.

Lucy really wanted some pasta.
As for tonight's dinner, I made a Spinach Artichoke Pasta. I needed to make something that would produce plenty of leftovers so that I would not starve the rest of the week. To be honest, I think I ended up with too much leftover. This is a dish that would have been better off shared, and I still would have had plenty left over. Ah well, you live you learn. The pasta itself was rather tasty, though I think it needed a little something. I'm opposed to adding salt to cooked dishes, but that might be what it needed. I also wonder if onions might be good in this... Either way, it was creamy and tasted a lot like spinach artichoke dip. It also paired well with a Chenin Blanc I picked up a few weeks ago at the PSU Farmer's Market. Mmm...

Spinach Artichoke Pasta
barely adapted from Heat Oven to 350
Ingredients:
14 oz shell pasta
1 tbsp butter
3 cloves minced fresh garlic
1 8 oz package reduced fat (not fat free) cream cheese
1/2 cup milk
1/2 cup reduced fat sour cream
1T lemon juice
1/2 tsp salt
1/2 tsp paprika
Freshly ground pepper to taste
1 14 oz can artichoke hearts (packed in water), drained and chopped
10 oz chopped, frozen spinach, thawed, thoroughly drained
1/2 cup Parmesan cheese
Additional Parmesan for serving

1. Cook the pasta according to package directions.

2. Melt the butter in a large pan over medium heat. Add the garlic and heat until just fragrant. Add the cream cheese and stir until melted (you may have to smoosh it with your spatula, as I did). Gradually stir in the milk and sour cream. Stir in the lemon juice, then add the salt, paprika, and pepper. Stir in the artichoke hearts, spinach, and Parmesan cheese. Let it get all melty and gooey.

3. Drain the pasta and dump it into a large serving bowl. Pour the artichoke sauce on top of the pasta and stir together until combined. Season with salt and lemon juice, if desired. Serve and enjoy!

Sunday, May 15, 2011

Tres Leches Cake

Way better than strawberry shortcake.
Oof. It's been one of those weeks. Nothing bad happened, in fact good things happened, but that didn't prevent me from feeling a little down. This happens sometimes, a little more often now that I live alone. It mainly happens when I start comparing myself to other people, which is never really a good thing for me to do. I'm just a little different, and I always have been.

Flowers from the market.
So I turn to baking, which is the one area of my life that I am really confident in. I don't often fail in the kitchen, and if that's me bragging, I think I'm allowed that much at this point. It's funny that I feel like it's my sole contribution to society. I remember in third grade making friends by sharing my fruit snacks in class. It was the only way I could get the semi-popular kids to like me. I still try to make friends using my mad skills in the kitchen, but it's a bit trickier than that now.

Strawberries!
This week I decided to get back to my baking roots by baking a cake. Cakes are what got me into baking in the first place. I chose to make a tres leches cake because I love the sweet sogginess of it, and I had never tried making one before. I found a recipe that looked pretty simple and forged ahead with my plan.

Mojito!
But with cake, I needed people to serve it to. I cannot consume an entire cake by myself, though I have been tempted in the past. So I asked my family if we could do a family dinner this weekend, and it didn't take much convincing. We decided to go with the Latin theme since I was making tres leches cake. My sister-in-law made a yummy tortilla casserole with random stuff like beans, zucchini, and cheese. My mom made her signature guacamole, my dad made mojitos, and my sister brought salad. It wasn't a big thing, but it was still nice.

The cake.
For the tres leches recipe, follow this link.

Sunday, May 8, 2011

Something Special

Oh so pretty and fancy-looking.
By now you should know that I've been on an ice cream kick lately. Making ice cream is a lot of fun and very rewarding. I knew I wanted to make another ice cream, but I wanted to take it one step further and make something really special.

Every now and then, I like to make something special just because. Mostly because it makes me feel good. It makes me feel especially good to come up with an idea and make it into reality. But I also like to treat myself. Hey, I'm a single girl, so I'm aloud to make myself feel special once in awhile. Though, I must say, my nephew made me feel pretty special today. He gave me a card for mother's day because even though I'm not a mother, I'm a pretty cool aunt. But also, he gave me a hug and kiss goodbye because he wanted to make me happy.

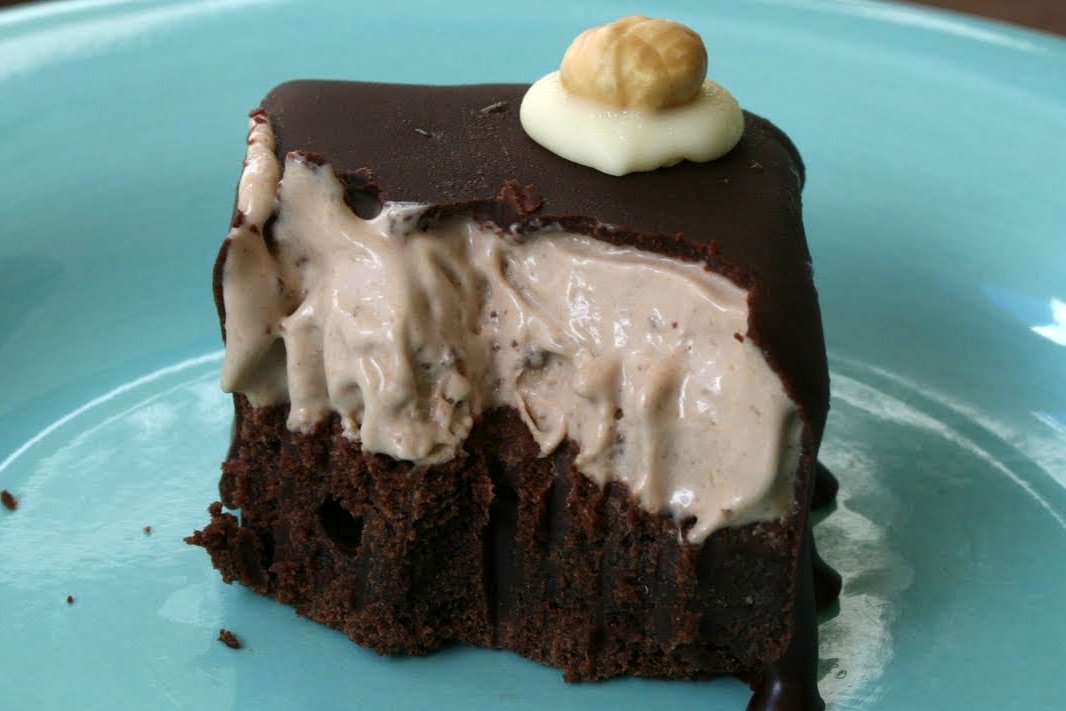
So, for my special treat, I knew I wanted to make a chocolate hazelnut ice cream. In addition, I wanted to involve a brownie. I also thought about chocolate-dipped ice cream, so I came up with an idea for a brownie base with hazelnut ice cream on top, enrobed in bittersweet chocolate, and topped with a little white chocolate and a roasted hazelnut.

The execution of this dessert was somewhat tricky. Next time, I will use a softer chocolate cake recipe, as the frozen brownie is a bit hard to get through (though mighty tasty). The hazelnut ice cream is incredibly addictive. Seriously. I could just sit there and eat all of it in one sitting. But my willpower is much stronger than that, thankfully.

So, without further ado, here is my recipe for a very lovely dessert. This is one I'll keep in my back pocket for the future, when I want to make something extra special for someone.

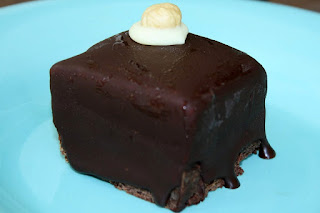
A little frostbitten, but still pretty.
Gianduja Gelato
from The Perfect Scoop

1 1/2 cups hazelnuts, toasted
1 cup whole milk
2 cups heavy cream
3/4 cup sugar
1/4 tsp coarse salt
4 oz milk chocolate, finely chopped
5 lrg egg yolks
1/8 tsp vanilla extract

Roast the hazelnuts in the oven at 350 degrees F for about 10 minutes, stirring once or twice. Remove the hazelnuts from the oven and rub them in a kitchen towel to remove as much of the skins as possible, then finely chop them in a food processor.

Warm the milk with 1 cup of the cream, sugar, and salt in a saucepan. Once warm, remove from the heat and add the chopped hazelnuts. Cover and let steep at room temperature for 1 hour.

Put the milk chocolate pieces in a large bowl. Heat the remaining 1 cup cream in a medium saucepan until it just begins to boil. Pour it over the milk chocolate pieces and stir until the chocolate is completely melted and smooth. Set a mesh strainer over top.

Pour the hazelnut-infused milk through a strainer into a medium saucepan, squeezing the nuts firmly with your hands to extract as much of the flavorful liquid as possible. Discard the hazelnuts.

Rewarm the hazelnut-infused mixture. In a separate medium bowl, whisk together the egg yolks. Slowly pour the warm hazelnut mixture into the egg yolks, whisking constantly, then scrape the warmed egg yolks back into the saucepan.

Stir the mixture constantly over medium heat with a heatproof spatula, scraping the bottom as you stir, until the mixture thickens and coats the spatula. Pour the custard through the strainer and stir it into the milk chocolate mixture. Add the vanilla and let cool.

Chill the mixture thoroughly in the refrigerator, then freeze it in your ice cream maker according to the manufacturer's instructions.

Chewy-Dense Brownies
from The Perfect Scoop

1/2 cup unsalted butter, cut into pieces
4 oz unsweetened chocolate, cut into small pieces
1 1/4 cups sugar
2 lrg eggs
1 tsp vanilla extract
1/2 cup flour
1/8 tsp salt

Preheat the oven to 350 degrees F.

Line an 8-inch square pan with a long sheet of aluminum foil that covers the bottom and reaches up the sides. Grease the bottom and sides of the foil with nonstick cooking spray.

Melt the butter in a medium saucepan. Add the chocolate pieces and stir constantly with a whisk over very low heat until the chocolate is melted.

Remove from the heat and stir in the sugar, then the eggs one at a time, and the vanilla. Stir in the flour and the salt. Beat the batter vigorously for 30 seconds, until it begins to form a smooth ball.

Scrape the batter into the prepared pan, smooth the top, and bake for 30 minutes, until the center feels just about set. Remove from the oven and let cool.

Chocolate Coating
adapted from the Tartufi recipe in The Perfect Scoop

8 oz bittersweet chocolate, chopped
8 tbsp unsalted butter, cut into pieces
2 tbsp corn syrup

Melt the chocolate, butter, and corn syrup in a medium bowl placed over a pan of simmering water, stirring constantly.
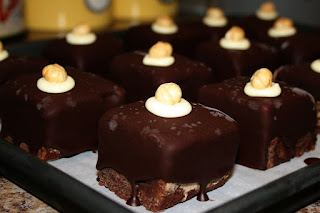
Enjoy!
To assemble my dessert:
1. Spread the freshly-churned ice cream over top of the brownies in the pan. You will not use all of the ice cream. Place in the freezer until firm.
2. Cut the brownie/ice cream combo into 16 pieces. This will be difficult as the brownies will be hard. Place these pieces on a line baking sheet, then place in the freezer until firm.
3. Dip the brownie pieces into the chocolate coating, then place back on the baking sheet and stick it back in the freezer until set.
4. Melt a little bit of white chocolate in the microwave, then spoon little dollops on top of the brownie pieces, placing a peeled roasted hazelnut on top. This makes it look fancy.

Note: This was a very messy and time-consuming process, but the end result was worth it. At one point, I though the brownies were to hard and it would not turn out, but I think they're at least beautiful. Plus, if you let the desserts thaw a little, the brownies part isn't so hard.

Monday, May 2, 2011

Double Chocolate Ice Cream for My Mom's Birthday

Chocolate Yumminess
This weekend we celebrated my mom's birthday, and she requested that I make her ice cream. She really didn't have to twist my arm on this one. I've been on an ice cream kick lately, and was excited to try out a different chocolate ice cream recipe.


Gloppy

Before I delve into the ice cream, however, let me take a minute to talk about my mom. I never give her enough credit, but she is a good mom. Whenever I'm sick, she's there, either making me toast or bringing me Jamba Juice. When I had to have my gallbladder removed, my mom was there at the hospital with me, holding my hand until the doctor wheeled me away. She was also there when it was time to put my old dog Ducky down and I wasn't strong enough to go into the vet's office. But my mom isn't just there when things are down. I have also had some great times with my mom, like riding the Rockin' Roller Coaster at Disney World on Mother''s Day, or travelling Scotland and Ireland together. My mom is also a loyal supporter of my bellydancing, and has sewed two costumes for me. In fact, my mom has sewed many costumes for me since I was a little girl. So, when my mom asked me to make ice cream for her, it was a no-brainer.

Now for the ice cream. It is creamy. It is chocolaty. It is a little bit crunchy. Simply put, it is delicious. It is chocolate stracciatella ice cream. For those of you not in the know, stracciatella is an Italian thing. When you go to my favorite gelato shop in Rome (the one with over 100 flavors), you will see several stracciatellas. Standard stracciatella is sweet cream gelato with ribbons of chocolate in it. I decided to make a bittersweet chocolate ice cream with ribbons of semi-sweet chocolate. My mom loves chocolate ice cream, so I figured this would be perfect. And it was.


Churning...
 Chocolate Ice Cream
from The Perfect Scoop

2 cups heavy cream
3 tbsp unsweetened Dutch-process cocoa powder
5 oz bittersweet chocolate, chopped
1 cup whole milk
3/4 cup sugar
Pinch of salt
5 lrg egg yolks
1/2 tsp vanilla extract

Warm 1 cup of the cream with the cocoa powder in a medium saucepan, whisking to thoroughly blend the cocoa. Bring to a boil, then reduce the heat and simmer at a very low boil for 30 seconds, whisking constantly. Remove from the heat and add the chopped chocolate, stirring until smooth. Then stir in the remaining cream. Pour the mixture into a large bowl, scraping the saucepan as thoroughly as possible, setting a mesh strainer on top of the bowl.

Warm the milk, sugar, and salt in the same saucepan. In a separate medium bowl, whisk together the egg yolks. Slowly pour the warm milk into the egg yolks, whisking constantly, then scrape the warmed egg yolks back into the saucepan.

Stir the mixture constantly over medium heat with a heatproof spatula, scraping the bottom as you stir, until the mixture thickens and coats the spatula. Pour the custard through the strainer and stir it into the chocolate mixture until smooth, then stir in the vanilla.

Chill the mixture thoroughly in the refrigerator, then freeze it in your ice cream maker according to the manufacturer's instructions.

Enjoy!
Stracciatella
from same book as above

5 oz semisweet chocolate, chopped

Melt the chocolate in a liquid measuring cup by zapping it in the microwave at 30-second intervals. I think mine took about 1 minute total. At the very last second of churning the ice cream, drizzle in the melted chocolate in thin streams, making sure not to get chocolate on the dasher. You can also spoon some into the ice cream as you layer it in a plastic container, making sure to break up the chunks.

Sunday, May 1, 2011

Easter Tea with Lemon Scones

Lemon Scone!
I'm sure you all know by now how I feel about tea as a meal. I love it. If you don't know, read this post. Well, my friends, I'm not the only one who likes tea. My family likes it too. Which is why we decided to do tea for Easter, in lieu of our usual brunch or dinner.

I knew as soon as we decided to have tea that I wanted to make scones, for what is a tea without scones? Nada, that's what. I decided to make the Sour Lemon Scones from my Baked cookbook, because lemon sounded nice and Spring-y. Besides, yellow is one of the wonderful colors I associate with Easter.


I also made these lovely sandwiches.
You might not know it, but I actually really love Easter. I mostly love the colors, but I also love the candy. And the Easter Bunny. And, most of all, the memories of dressing in matching dresses that my mom made for my sister and I and going to church wearing our Sunday finest.

As for the scones, they were well received by all. I actually served them at two teas in one weekend (yes, I was so lucky!). At both teas, they were a hit. They were tender and flaky, best served fresh out of the oven, no accompaniment needed. They were just lemony enough, though I'm not sure why they are called "sour lemon" scones, as there is nothing sour about these scones. Simply delicious.


Enjoy!
 Sour Lemon Scones
from Baked: New Frontiers in Baking

4 cups all-purpose flour
1/2 cup sugar
1 tbsp baking powder
1/2 tsp baking soda
1/2 tsp kosher salt
1/2 tsp ginger
3 sticks unsalted butter, cubed and cold
1 lrg egg
1 cup buttermilk
1/4 cup grated lemon zest (from about 3 lemons)
2 tbsp raw sugar

Preheat the oven to 350 degrees F. Line a baking sheet with parchment paper.

In a large bowl, combine the flour, sugar, baking powder, baking soda, salt, and ginger. Whisk until combined.

Add the butter. Use your fingertips to rub the butter into the flour until the butter is pea-sized.

In a separate bowl, whisk together the egg, 3/4 cup of the buttermilk, and the lemon zest. Slowly pour the wet ingredients into the dry ingredients, and then gently knead the dough with your hands until the dough starts to come together. Move the dough to a lightly floured surface. Use your hands to shape the dough into two discs (about 1 1/2 inches in height). Do not overwork the dough.

Cut each disk into 6 wedges. Place the wedges onto the prepared baking sheet. Brush each scone with the remaining buttermilk and sprinkle with raw sugar. Bake in the center of the oven for about 25 to 30 minutes (rotating the baking sheet halfway through the baking time) or until the scones are golden brown.

Transfer the scones to a cooling rack; they can be served slightly warm or completely cooled.

Note: Since I served these twice, on day one I put one of the discs, wrapped in plastic wrap, in the fridge until the next day when I was ready to bake and serve them.